实时音视频
实时音视频


- 文档首页
 实时音视频实时音视频快速入门实现音视频通话微信小程序

本文介绍如何创建一个微信小程序 RTC 项目,实现音视频通话功能。
由于平台限制,微信小程序 SDK 的媒体能力与其他端存在差异,详见 微信小程序 SDK 媒体能力上限。
前提条件
开始前,请确保你的开发环境满足如下条件:
- 一个经过企业认证的微信小程序账号
调试 RTC 微信小程序 Demo 过程中,需要使用小程序的 live-pusher 和 live-player 功能标签,用于支持音视频上行和下行(播放)能力,目前微信只向特定行业的认证企业账号开放这两个标签的使用。
下载并安装最新版本的微信开发者工具
至少一台安装有微信 App 的移动设备
微信 App iOS 最低版本要求:6.5.21
微信 App Android 最低版本要求:6.5.19
小程序基础库最低版本要求:1.7.0
步骤 1:获取 AppId 和 Token
参考 RTC 接入指南获取 AppId。
在开发阶段,你可以在控制台生成并使用临时 Token。正式上线后,Token 应由你的应用服务端生成,下发到你的应用客户端。应用客户端在加入 RTC 房间时,必须携带正确的 Token。你可以通过阅读密钥说明了解更多 Token 相关。
步骤 2:开通小程序组件权限
进入微信公众平台 -> 【</> 开发】 -> 【接口设置】,打开 实时播放音视频流 和 实时录制音视频流 的开关。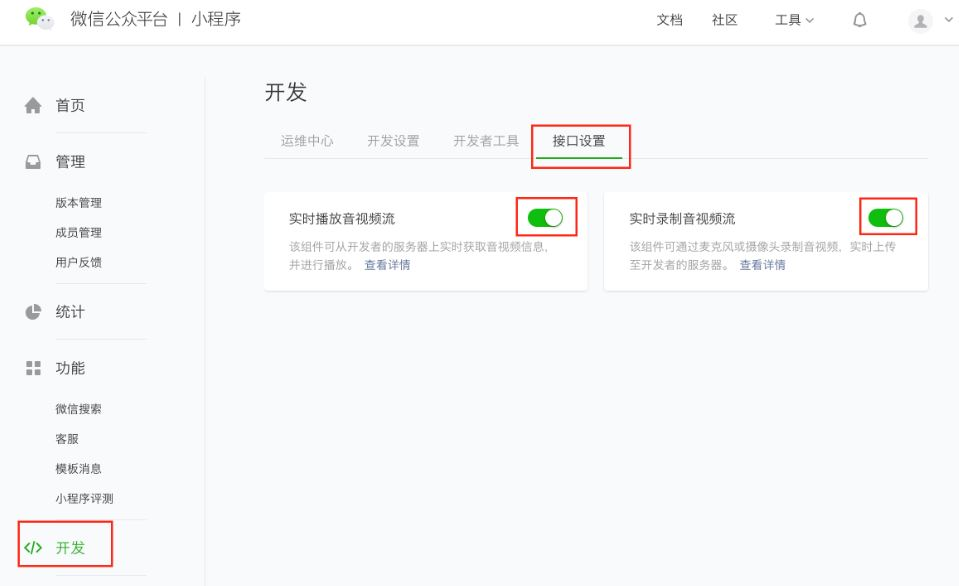
步骤 3:配置服务器域名
进入微信公众平台 -> 【</> 开发】 -> 【开发设置】,将如下域名配到服务器域名里:
- request 合法域名 :以 https 开头的域名
https://common.rtc.volcvideo.com;
https://common-hl.rtc.volcvideo.com;
https://log.snssdk.com;
- socket 合法域名 :以 wss 开头的域名
wss://ws.rtc.volcvideo.com;
wss://ws-hl.rtc.volcvideo.com;
wss://ws-ag-agsxxa.rtc.volcvideo.com;
wss://ws-ag-aghbwh.rtc.volcvideo.com;
wss://ws-ag-agsdqd.rtc.volcvideo.com;
wss://ws-ag-agjsnj.rtc.volcvideo.com;
wss://ws-ag-aggdsz.rtc.volcvideo.com;
步骤 4:集成小程序 SDK
- 将解压后的 SDK 包复制到项目
../lib路径下。
为方便维护,建议重命名 SDK 包文件,例如(
miniapp-rtc.min.js,不带版本号)。当未来升级 SDK时,你只需要替换这个文件即可,而不需要修改任何引用了该文件的代码(如 import 或 require 语句)。
.
├── components
│   ├── v-player
│   │   ├── v-player.js
│   │   ├── v-player.json
│   │   ├── v-player.wxml
│   │   └── v-player.wxss
│   └── v-pusher
│       ├── 1.png
│       ├── v-pusher.js
│       ├── v-pusher.json
│       ├── v-pusher.wxml
│       └── v-pusher.wxss
├── lib
│   ├── miniapp-rtc.min.js
├── pages
│   ├── meeting
│   │   ├── meeting.ts
│   │   ├── meeting.json
│   │   ├── meeting.wxml
│   │   └── meeting.wxss
- 使用
require将小程序 SDK 集成到你的项目中。
const VolcMiniappSdk = require('../../lib/miniapp-rtc.min.js');
步骤 5:实现功能
参考如下流程,完成你的项目。
创建 client 对象
通过 new Client 创建 client 对象。client 接口中包含的成员函数提供了音视频通话的核心功能,例如进入房间、发布和订阅音视频流等。
将以下示例代码加入到 meeting.ts 中。
Page({
    onReady() {
        this.client = new VolcMiniappSdk.Client();
        this.client.init(APPID) // APPID 的获取方式详见【步骤1】。
    },
});
进入房间
调用 client.join 方法初始化 client 对象和进入房间。
将以下示例代码加入到 meeting.ts 中。
Page({
    join() {
        this.client.join(TOKEN, ROOMID, USERID) // Token 的获取方式详见【步骤1】
    }
});
ROOMID 和 USERID 在同一 AppID 下唯一,你需要自行维护,参见赋值规范。
发布音视频流
成功加入房间成功后,可以调用 client.publish 发布本地音视频流。成功发布后,SDK 会返回该路音视频流的 URL。
- 将 v-pusher 组件引入到项目中。
在meeting.json中添加以下示例代码。
{
  "usingComponents": {
    "v-pusher": "../../components/v-pusher/v-pusher"
  }
}
- 调用 SDK 的 client.publish 方法,获取到当前推流地址。
在meeting.ts中添加以下示例代码。
Page({
    publish() {
        this.client.publish().then(url => {
            this.setData({
                publishUrl: url
            })
        })
    }
})
- 将推流地址赋值给 v-pusher 组件。
在meeting.wxml中添加以下示例代码。
<v-pusher
  wx:if="{{pushUrl}}"
  id="volc-pusher"
  url="{{pushUrl}}"
  enable-mic="{{true}}"
  enable-camera="{{true}}"
  beauty="{{0}}"
  bind:pusherstatechange="pusherStateChange"
  bind:pushernetstatuschange="pusherNetStatusChange"
/>
- 通过 RTC SDK 收集媒体流状态和信息。
在meeting.ts中添加以下示例代码。
Page({
    pusherStateChange(e) {
      const target = e.detail;
      this.client.reportPusherStateChange(
        target.detail.code,
        target.detail.message,
      );
    },

    pusherNetStatusChange(e) {
      const info = e?.detail?.detail?.info;
      this.client.reportPusherNetStatusChange(info);
    },
})
订阅远端音视频流
订阅流要在加入房间成功之后。
- 在 meeting 中引入 v-player 组件。
在meeting.json中添加以下示例代码。
{
  "usingComponents": {
    "v-pusher": "../../components/v-pusher/v-pusher",
    "v-player": "../../components/v-player/v-player"
  }
}
- 监听 VolcEngineRTCMiniappSDK.EVENTS.STREAM_ADDED 事件,感知房间内流加入事件。
在meeting.ts中添加以下示例代码。
Page({
    data: {
        remoteStreams: [],
    },
    subscribe(uid, screen) {
        this.client.subscribe(uid, { screen }).then(url => {
            this.setData({
                ...this.data.remoteStreams,
                {
                    uid,
                    screen,
                    url,
                    id: `${uid}-${screen ? 1 : 0}`
                }
            })
        })
    },
    _handleClientEvents() {
        if (this.client) {
            this.client.removeAllListeners();
        }
        this.client.on(VolcEngineRTCMiniappSDK.EVENTS.STREAM_ADDED, (e) => {
            const { uid, screen } = e;
            this.subscribe(uid, screen)
        })
    }
})
- 通过 v-player 组件获取和播放远端音视频流。
在meeting.wxml中添加以下示例代码。
<view wx:for="{{remoteStreams}}" wx:key="id" class="player-container">
    <view>
      <v-player
        url="{{item.url}}"
        uid="{{item.uid}}"
        screen="{{item.screen ? 1 : 0}}"
        bind:playerstatechange="playerStateChange"
        bind:playernetstatuschange="playerNetStatusChange"
      />
    </view>
  </view>
- 通过 RTC SDK 收集媒体流状态和信息。
在meeting.ts中添加以下示例代码。
Page({
  playerNetStatusChange(e) {
    const uid = e?.detail?.uid;
    const info = e?.detail?.e?.detail?.info;
    this.client.reportPlayerNetStatusChange(uid, info);
  },

  playerStateChange(e) {
    const uid = e?.detail?.uid;
    this.client.reportPlayerStateChange(
      uid,
      e?.detail?.e?.detail?.code,
      e?.detail?.e?.detail?.message,
    );
  },
})
v-pusher
传入参数如下:
属性 | 含义 | 类型 | 默认值 |
|---|---|---|---|
url | 推流地址 | string | 无 |
enableCamera | 是否开启摄像头 | boolean | true |
enbaleMic | 是否开启麦克风 | boolean | true |
beauty | 是否开启美颜和美颜等级 取值范围 0 - 9 0 代表不开启 | number | 0 |
live-pusher 提供了 2 个回调,监控上行媒体流状态。
- bindstatechange:摄像头开启、视频编码、上行媒体流连接状态。可以根据该状态来提示用户是否发布成功。
1008:成功-1307:失败
- bindnetstatus:推流过程中的码率、帧率、分辨率等
将以下示例代码加入到v-pusher.wxml中。
<view class="pusher-view">
  <!--
    mode: RTC 实时通话
    background-mute: true 进入后台静音(兼容旧版本)
    其他配置请参考小程序文档: https://developers.weixin.qq.com/miniprogram/dev/component/live-pusher.html
   -->
  <live-pusher
    class="pusher"
    url="{{url}}"
    mode="RTC"
    autopush="true"
    max-bitrate="500"
    min-bitrate="200"
    beauty="{{beauty}}"
    bindstatechange="bindstatechange"
    bindnetstatus="bindnetstatus"
    enable-camera="{{enableCamera}}"
    enable-mic="{{enableMic}}"
    aspect="3:4"
  />

  <view class="info">
    {{state === 'init' ? '相机启动中' : state === 'error' ? '相机启动失败' : ''}}
  </view>
</view>
将以下示例代码加入到v-pusher.js中。
Component({
  properties: {
    url: {
      type: String,
      value: '',
    },
    enableCamera: {
      type: Boolean,
      value: true,
    },
    enableMic: {
      type: Boolean,
      value: true,
    },
    beauty: {
      type: Number,
      value: 0,
    },
    state: {
      type: String,
      // init: 启动中 ok: 正常推流 error: 推流失败
      value: 'init',
    },
  },
  data: {},

  lifetimes: {
    ready: function () {
      if (!this.livePusherContext) {
        this.livePusherContext = wx.createLivePusherContext(this);
      }
    },
    detached: function () {
      this.stop();
    },
  },

  methods: {
    stop: function () {
      if (this.livePusherContext) {
        this.livePusherContext.stop();
      }
    },
    switchCamera: function () {
      if (this.livePusherContext) {
        this.livePusherContext.switchCamera();
      }
    },

    bindstatechange: function (e) {
      // emit to page
      this.triggerEvent('pusherstatechange', e);

      if (e.detail.code === -1307) {
        this.setData({
          state: 'error',
        });
      }

      if (e.detail.code === 1008) {
        if (this.data.state === 'init') {
          this.setData({
            state: 'ok',
          });
        }
      }
    },

    bindnetstatus: function (e) {
      // emit to page
      this.triggerEvent('pushernetstatuschange', e);
    },
  },
});
v-player
传入参数如下:
属性 | 含义 | 类型 | 默认值 |
|---|---|---|---|
url | 拉流地址 | string | 无 |
uid | 流的发布者 | string | 无 |
screen | 流是否为屏幕共享流 | 0 | 1 | 0 |
live-player 提供了 2 个回调,监控下行媒体流状态
- bindstatechange:服务器连接状态、解码、播放器启动等。可以根据该状态来判断获取和播放远端音视频流是否成功
2004:成功-2301:失败
- bindnetstatuschange:获取和播放远端音视频流过程中的码率、帧率、分辨率等
将以下示例代码加入到v-player.wxml中。
<view class="player-view">
  <!--
    mode: RTC 实时通话
    background-mute: true 进入后台静音(兼容旧版本)
    其他配置请参考小程序文档: https://developers.weixin.qq.com/miniprogram/dev/component/live-player.html
   -->
  <live-player
    src="{{url}}"
    id="v-player-{{uid}}-{{screen}}"
    data-uid="{{uid}}"
    class="player"
    mode="RTC"
    autoplay="true"
    object-fit="fillCrop"
    background-mute="true"
    bindstatechange="bindstatechange"
    bindnetstatus="bindnetstatuschange"
    debug="{{true}}"
  />

  <view class="info">
    {{state === 'init' ? '播放器启动中' : state === 'error' ? '播放器启动失败' : ''}}
  </view>
</view>
将以下示例代码加入到v-player.js中。
Component({
  properties: {
    url: {
      type: String,
      value: '',
    },
    uid: {
      type: String,
      value: '',
    },
    screen: {
      type: String,
      // '0' camera stream '1' screen stream
      value: '0',
    },
    state: {
      type: String,
      // init: 启动中 ok: 正常推流 error: 推流失败
      value: 'init',
    },
  },
  data: {},

  lifetimes: {
    ready: function () {
      if (!this.livePlayerContext) {
        this.livePlayerContext = wx.createLivePlayerContext(
          `v-player-${this.data.uid}-${this.data.screen}`,
          this,
        );
      }
    },
    detached: function () {
      if (this.livePlayerContext) {
        this.livePlayerContext.stop();
      }
    },
  },

  methods: {
    bindstatechange: function (e) {
      // emit to page
      this.triggerEvent('playerstatechange', { uid: this.data.uid, e });

      if (e.detail.code === 2004) {
        if (this.data.state === 'init') {
          this.setData({
            state: 'ok',
          });
        }
      } else if (e.detail.code === -2301) {
        this.setData({
          state: 'error',
        });
      }
    },
    bindnetstatuschange: function (e) {
      // emit to page
      this.triggerEvent('playernetstatuschange', { uid: this.data.uid, e });
    },
  },
});
步骤 6:运行和验证
- 打开微信开发者工具,点击小程序界面的【 + 】。
- 在创建项目的界面中填入你的项目名称、目录、微信小程序的 App ID 等信息,点击【确定】。
- 完成开发后,微信开发者工具上会出现小程序项目的界面。选择【真机调试】。点击右上角的【真机调试】,工具界面会出现一个真机调试的二维码。
- 使用移动端微信 App 扫描二维码,进入调试界面。