智能视频创作SDK
智能视频创作SDK


- 文档首页
 智能视频创作SDK1.7.0SDK接入指引【Android】接入指南其它语言接入Flutter

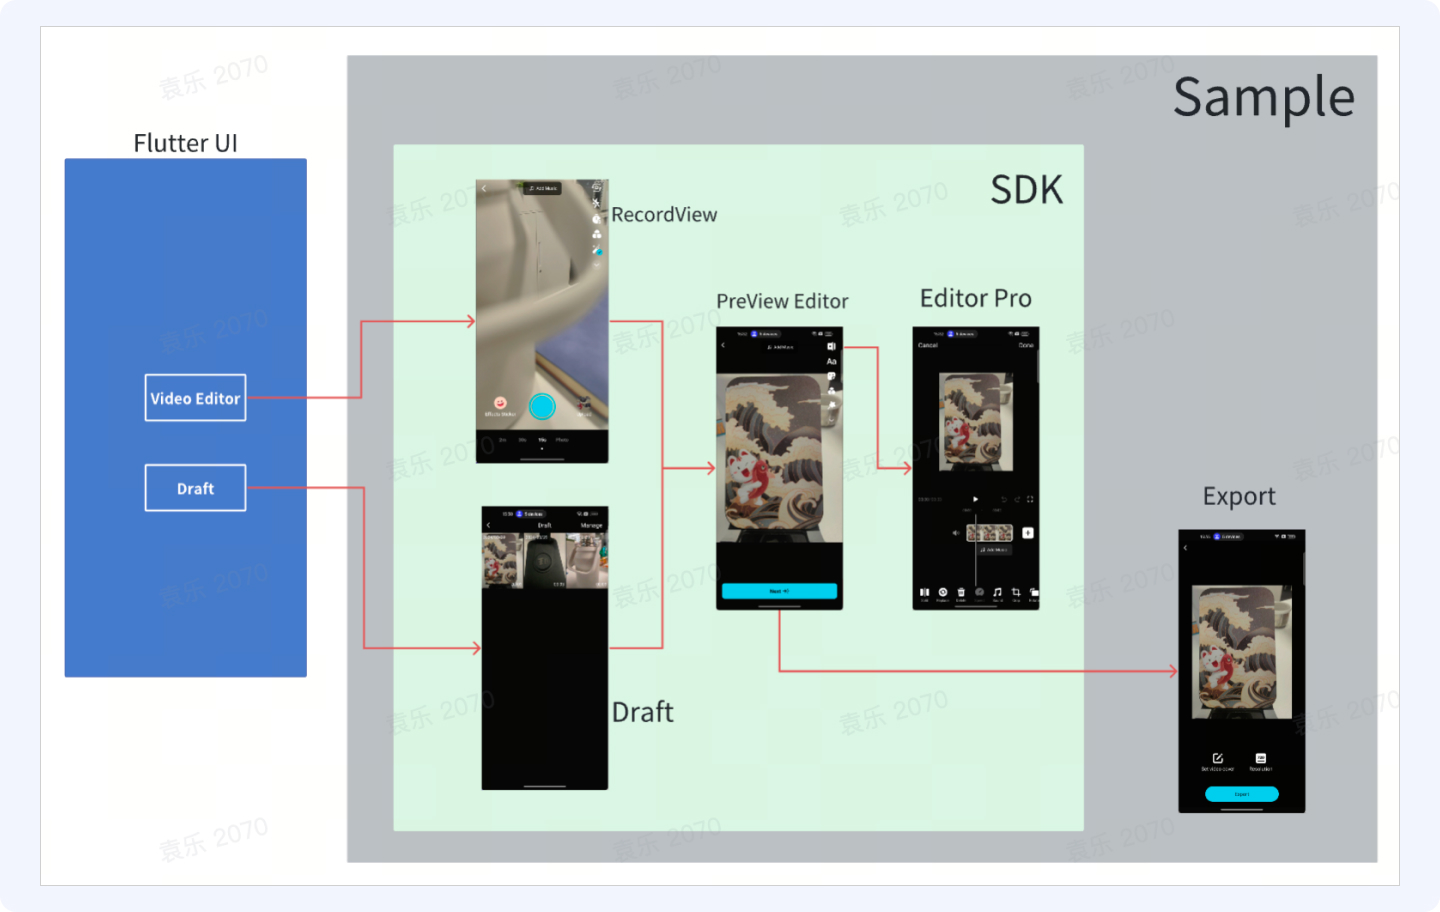
主要包含了SDK模块(拍摄、编辑、草稿箱)和 导出Export模块以及业务Business模块。
Flutter
- Android Studio / VSCode
- Flutter SDK 3.16+
Android
参考快速开始-开发环境介绍
这里以新建一个Flutter工程为例讲解,如果有现有的Flutter工程,可以忽略
Flutter App项目创建 参照官网 选择你的开发平台,开始使用
// create create command
// --org org name
//--platforms android,ios
flutter create --org com.volcengin.effectone --platforms android,ios effectone_flutter_sample //创建demo项目
flutter run //运行demo项目
Flutter工程结构
对齐标准的 Flutter 结构
├── README.md
├── analysis_options.yaml
├── android
├── build
├── ios
├── lib
├── pubspec.lock
├── pubspec.yaml
└── test
Android代码在android目录下
Flutter Dart代码在lib/main.dart中
配置Android项目
参考Effectone接入文档-Android_v1.1.0-快速集成EffectOneSDK
完成集成后,通过flutter run运行安装Demo,如果没有报错,说明已经成功集成了effectone sdk
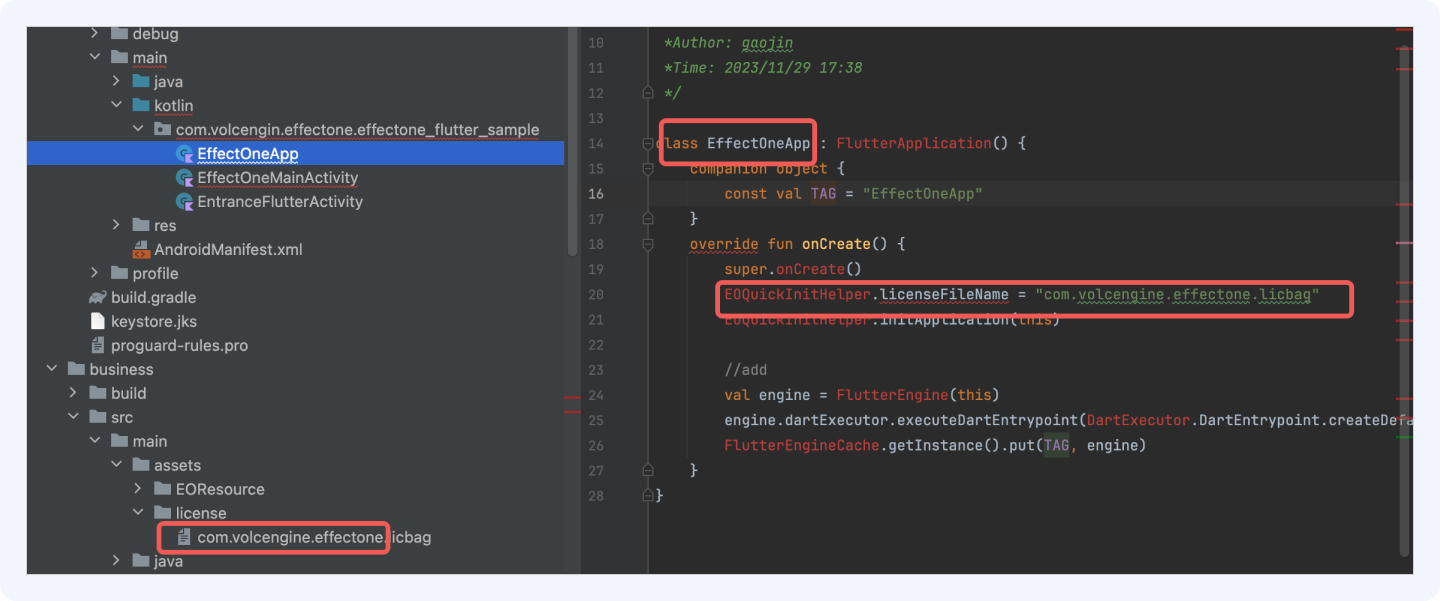
Sample Application
class EffectOneApp : Application() {

    override fun onCreate() {
        super.onCreate()
        EOQuickInitHelper.licenseFileName = "your license file name"
        EOQuickInitHelper.initApplication(this)
    }
}
Dart编写
import 'package:flutter/material.dart';

import 'package:flutter/services.dart';

void  main() {
    runApp(const  MyApp());

}

class MyApp extends StatelessWidget {
  const  MyApp({super.key});

  // This widget is the root of your application.
  @override
    Widget build(BuildContext context) {
    return  MaterialApp(
            title:  'Flutter Demo',
            theme: ThemeData(
        // This is the theme of your application.
        //
        // TRY THIS: Try running your application with "flutter run". You'll see
        // the application has a purple toolbar. Then, without quitting the app,
        // try changing the seedColor in the colorScheme below to Colors.green
        // and then invoke "hot reload" (save your changes or press the "hot
        // reload" button in a Flutter-supported IDE, or press "r" if you used
        // the command line to start the app).
        //
        // Notice that the counter didn't reset back to zero; the application
        // state is not lost during the reload. To reset the state, use hot
        // restart instead.
        //
        // This works for code too, not just values: Most code changes can be
        // tested with just a hot reload.
                colorScheme: ColorScheme.fromSeed(seedColor: Colors.deepPurple),
                useMaterial3:  true,
            ),
            home:  const  MyHomePage(title:  'Flutter Demo Home Page'),
            routes: <String, WidgetBuilder>{
        "export": (context) => MyExportPage(title:  'Flutter Demo Export Page')
            },
        );
    }

}

class MyExportPage extends StatefulWidget {
  const  MyExportPage({super.key,  required this.title});

  // This widget is the home page of your application. It is stateful, meaning
  // that it has a State object (defined below) that contains fields that affect
  // how it looks.
  // This class is the configuration for the state. It holds the values (in this
  // case the title) provided by the parent (in this case the App widget) and
  // used by the build method of the State. Fields in a Widget subclass are
  // always marked "final".
  final String  title;

  @override
    State<MyExportPage> createState() => _MyExportPageState();

}

class _MyExportPageState extends State<MyExportPage>  {

  void  _exportCounter() {
        setState(() {
      print('导出');
            callNativeMethodWithMethodName("export");
        });
    }

  static const  platform = MethodChannel("effectOne.export");
    Future<void> callNativeMethodWithMethodName(String  methodName)  async  {
    try  {
      await  platform.invokeMethod(methodName);
        }  on  PlatformException  catch  (e) {
      print("Failed to call native method:  ${e.message}");
        }
    }

  @override
    Widget build(BuildContext context) {
    // This method is rerun every time setState is called, for instance as done
    // by the _incrementCounter method above.
    //
    // The Flutter framework has been optimized to make rerunning build methods
    // fast, so that you can just rebuild anything that needs updating rather
    // than having to individually change instances of widgets.
    return  Scaffold(
            appBar: AppBar(
        // TRY THIS: Try changing the color here to a specific color (to
        // Colors.amber, perhaps?) and trigger a hot reload to see the AppBar
        // change color while the other colors stay the same.
                backgroundColor: Theme.of(context).colorScheme.inversePrimary,
        // Here we take the value from the MyHomePage object that was created by
        // the App.build method, and use it to set our appbar title.
                title: Text(widget.title),
            ),

            body: Center(
        // Center is a layout widget. It takes a single child and positions it
        // in the middle of the parent.
                child: Column(
          // Column is also a layout widget. It takes a list of children and
          // arranges them vertically. By default, it sizes itself to fit its
          // children horizontally, and tries to be as tall as its parent.
          //
          // Column has various properties to control how it sizes itself and
          // how it positions its children. Here we use mainAxisAlignment to
          // center the children vertically; the main axis here is the vertical
          // axis because Columns are vertical (the cross axis would be
          // horizontal).
          //
          // TRY THIS: Invoke "debug painting" (choose the "Toggle Debug Paint"
          // action in the IDE, or press "p" in the console), to see the
          // wireframe for each widget.
                    mainAxisAlignment: MainAxisAlignment.center,
                    children: <Widget>[
                        TextButton(
                            onPressed: _exportCounter,
                            child: Text("Export"),
                        ),
                    ],
                ),
            ),
      // This trailing comma makes auto-formatting nicer for build methods.
        );
    }

}

class MyHomePage extends StatefulWidget {
  const  MyHomePage({super.key,  required this.title});

  // This widget is the home page of your application. It is stateful, meaning
  // that it has a State object (defined below) that contains fields that affect
  // how it looks.
  // This class is the configuration for the state. It holds the values (in this
  // case the title) provided by the parent (in this case the App widget) and
  // used by the build method of the State. Fields in a Widget subclass are
  // always marked "final".
  final String  title;

  @override
    State<MyHomePage> createState() => _MyHomePageState();

}

class _MyHomePageState extends State<MyHomePage>  {

  void  _recorderCounter() {
        setState(() {
      print('拍摄');
            callNativeMethodWithMethodName("record");
        });
    }
  void  _draftCounter() {
        setState(() {
            callNativeMethodWithMethodName("draft");
        });
    }
  static const  platform = MethodChannel("effectOne.flutter");
    Future<void> callNativeMethodWithMethodName(String  methodName)  async  {
    try  {
      await  platform.invokeMethod(methodName);
        }  on  PlatformException  catch  (e) {
      print("Failed to call native method:  ${e.message}");
        }
    }

  @override
    Widget build(BuildContext context) {
    // This method is rerun every time setState is called, for instance as done
    // by the _incrementCounter method above.
    //
    // The Flutter framework has been optimized to make rerunning build methods
    // fast, so that you can just rebuild anything that needs updating rather
    // than having to individually change instances of widgets.
    return  Scaffold(
            appBar: AppBar(
        // TRY THIS: Try changing the color here to a specific color (to
        // Colors.amber, perhaps?) and trigger a hot reload to see the AppBar
        // change color while the other colors stay the same.
                backgroundColor: Theme.of(context).colorScheme.inversePrimary,
        // Here we take the value from the MyHomePage object that was created by
        // the App.build method, and use it to set our appbar title.
                title: Text(widget.title),
            ),

            body: Center(
        // Center is a layout widget. It takes a single child and positions it
        // in the middle of the parent.
                child: Column(
          // Column is also a layout widget. It takes a list of children and
          // arranges them vertically. By default, it sizes itself to fit its
          // children horizontally, and tries to be as tall as its parent.
          //
          // Column has various properties to control how it sizes itself and
          // how it positions its children. Here we use mainAxisAlignment to
          // center the children vertically; the main axis here is the vertical
          // axis because Columns are vertical (the cross axis would be
          // horizontal).
          //
          // TRY THIS: Invoke "debug painting" (choose the "Toggle Debug Paint"
          // action in the IDE, or press "p" in the console), to see the
          // wireframe for each widget.
                    mainAxisAlignment: MainAxisAlignment.center,
                    children: <Widget>[
                        TextButton(
                            onPressed: _recorderCounter,
                            child: Text("Recorder"),
                        ),

                        TextButton(
                            onPressed: () {
                print('草稿箱');
                                _draftCounter();
                            },
                            child: Text('Draft'),
                        ),
                    ],
                ),
            ),
      // This trailing comma makes auto-formatting nicer for build methods.
        );
    }

}
初始化Sample Activity
注册record和draft两个NativeMethod,分别对应启动拍摄页和启动草稿页
private const val  METHOD_CHANNEL_NAME  = "effectOne.flutter"
private const val  METHOD_NAME_DRAFT  = "draft"
private const val  METHOD_NAME_RECORD  = "record"
class MainActivity: FlutterFragmentActivity() {
    private var authResult = false
    override fun onCreate(savedInstanceState: Bundle?) {
        super.onCreate(savedInstanceState)
        EOQuickInitHelper.prepareAndInit() {  result, str ->
            this.authResult = result
        }
    }

    override fun configureFlutterEngine(flutterEngine: FlutterEngine) {
        GeneratedPluginRegistrant.registerWith(flutterEngine)
        MethodChannel(flutterEngine.dartExecutor.binaryMessenger, METHOD_CHANNEL_NAME)
            .setMethodCallHandler {  call: MethodCall, _ ->
                when (call.method) {
                    METHOD_NAME_DRAFT  -> {
                        if (authResult) {
                            EOQuickInitHelper.startDraft(this@MainActivity)
                        }
                    }

                    METHOD_NAME_RECORD  -> {
                        if (authResult) {
                            EOQuickInitHelper.startRecorder(this@MainActivity)
                        }
                    }

                }

            }
    }
}
导出Activity
参考Effectone接入文档-Android_v1.1.0-导出视频
如果需要通过Flutter自定义开发导出页UI,参考以下步骤:
新建一个ExportActivity,参考 Effectone接入文档-Android_v1.1.0-导出Activity配置。EO通过action:"com.volcengine.effectone.Launch.EOExport"和intent,将数据传入对应的Activity
在ExportActivity中,创建 ExportFragment : FlutterFragment(),route到Dart中的MyExportPage。并在ExportFragment中注册NativeMethod:export
class ExportActivity: FragmentActivity() { private lateinit var eoExportManager: EOExportManager private var exportActionView: View? = null override fun onCreate(savedInstanceState: Bundle?) { super.onCreate(savedInstanceState) setContentView(R.layout.activity_export); // Create and attach a FlutterFragment if one does not exist. val flutterFragment = ExportFragment() getSupportFragmentManager() .beginTransaction() .add( R.id.flutter_container, flutterFragment, "TAG_FLUTTER_FRAGMENT" ) .commit(); } } private const val METHOD_CHANNEL_EXPORT = "effectOne.export" private const val METHOD_NAME_EXPORT = "export" class ExportFragment : FlutterFragment() { private lateinit var eoExportManager: EOExportManager override fun getInitialRoute(): String { return "export" } override fun onViewCreated(view: View, savedInstanceState: Bundle?) { super.onViewCreated(view, savedInstanceState) eoExportManager = EOExportManager.init(requireActivity()) { suc -> if (!suc) { requireActivity().finish() } } } //导出的核心方法 private fun runExportAction() { val saveDir = Environment.getExternalStoragePublicDirectory(Environment.DIRECTORY_DCIM).absolutePath val dateFormat = SimpleDateFormat("yyyyMMdd-HHmmss", getDefault()) val exportFileName = "sample-${dateFormat.format(Date())}.mp4" val exportFilePath = "$saveDir${File.separator}$exportFileName" //>>>> step2 导出 eoExportManager.exportVideo( outputPath = exportFilePath, outputSetting = EOOutputVideoSettings(), exportListener = EOExportDefaultListener() ) } override fun configureFlutterEngine(flutterEngine: FlutterEngine) { super.configureFlutterEngine(flutterEngine) MethodChannel(flutterEngine.dartExecutor.binaryMessenger, METHOD_CHANNEL_EXPORT) .setMethodCallHandler { call: MethodCall, _ -> when (call.method) { METHOD_NAME_EXPORT -> { Toast.makeText(requireActivity(), "export start", Toast.LENGTH_SHORT).show() runExportAction() } } } } }如需使用EOExportManager的其他功能,如抽帧,预览等,可参考EffectOne-Android视频导出接口介绍以及Demo工程中的EffectOneExportViewModel
flutter clean
flutter run
工程问题排查
Flutter
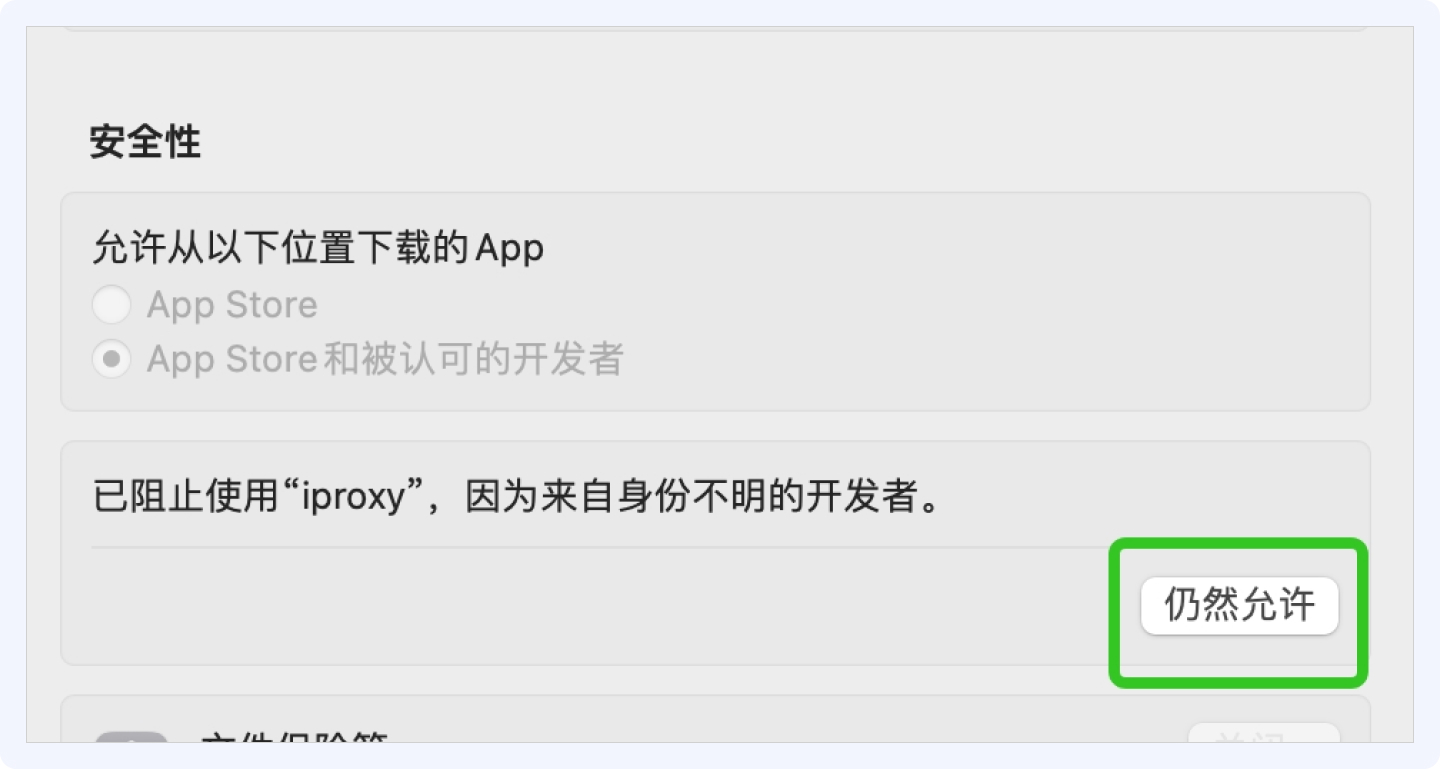
- Mac 环境下,调试 Flutter 项目时,若遇到以下弹框
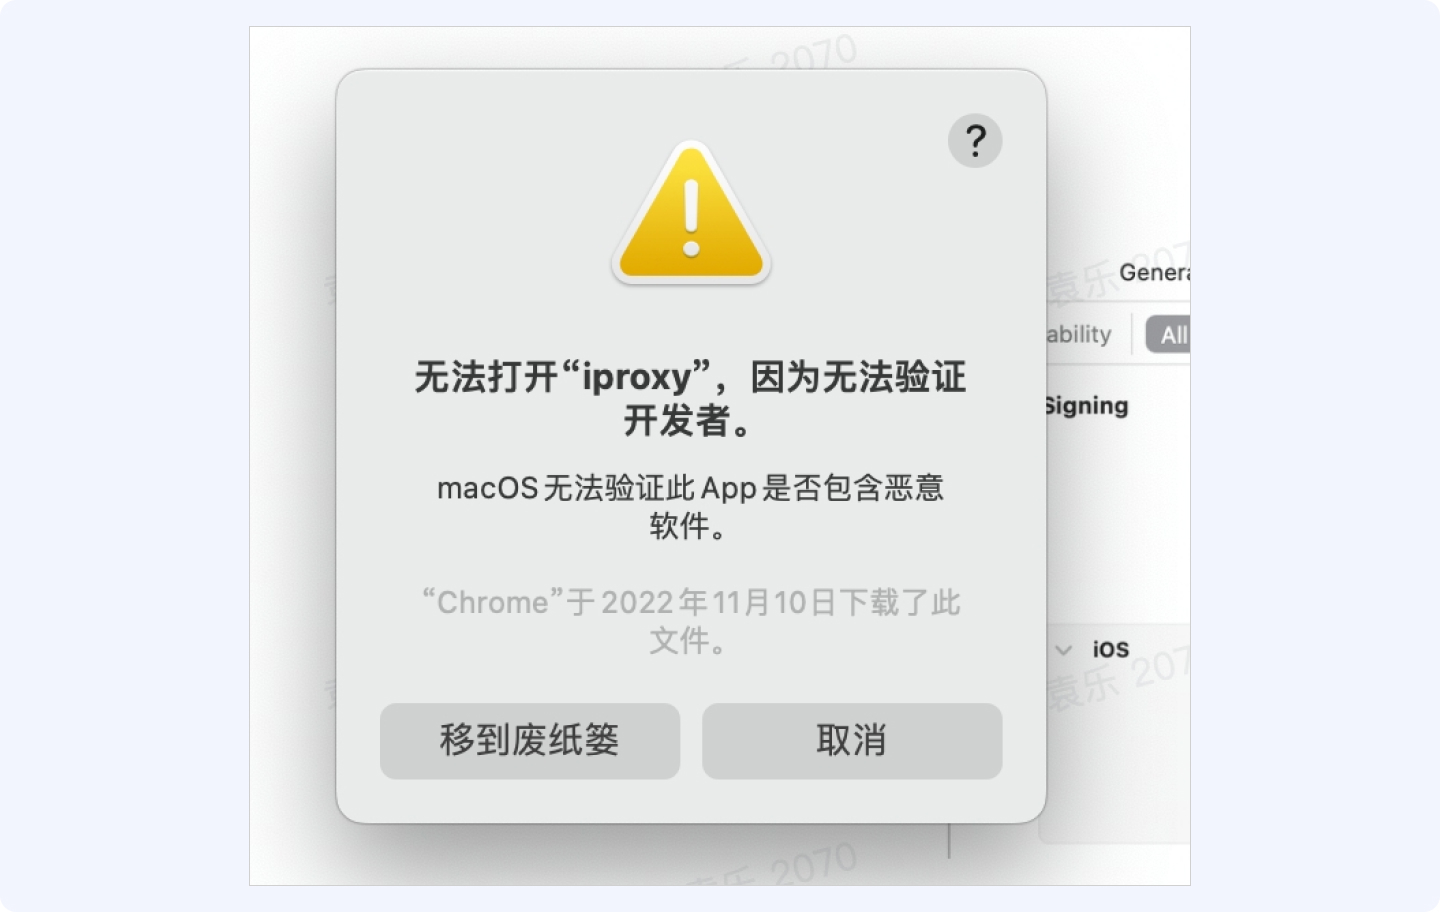
需要信任一下,否则会有首页白屏的情况,步骤如下:
a. 打开系统偏好设置-隐私与安全性,就可以需要信任的提示。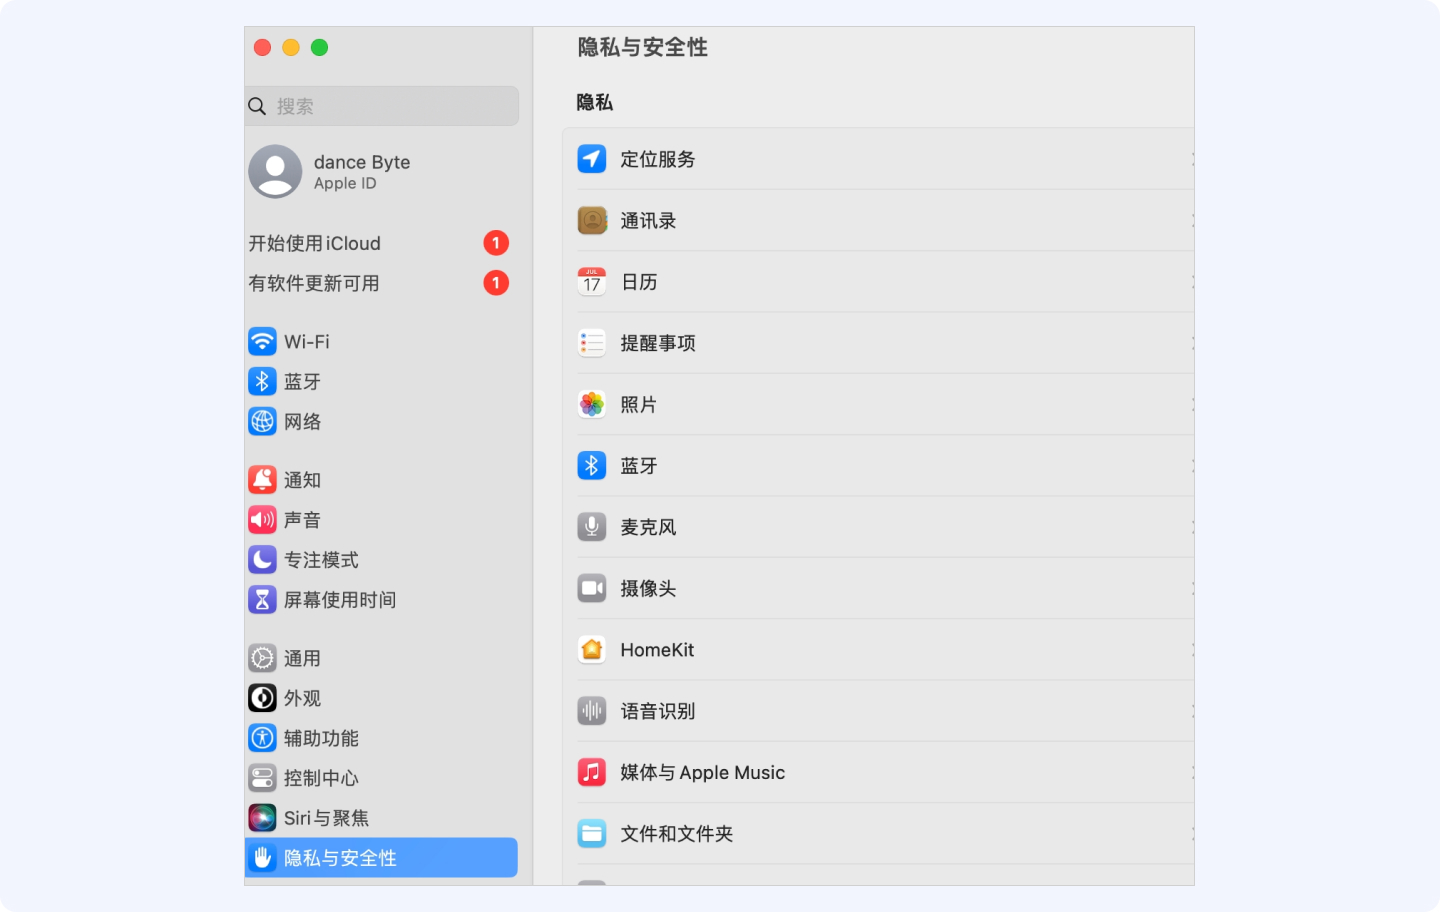
b. 在 Android Studio,重新 run 一下,会有以下提示,选择「打开」。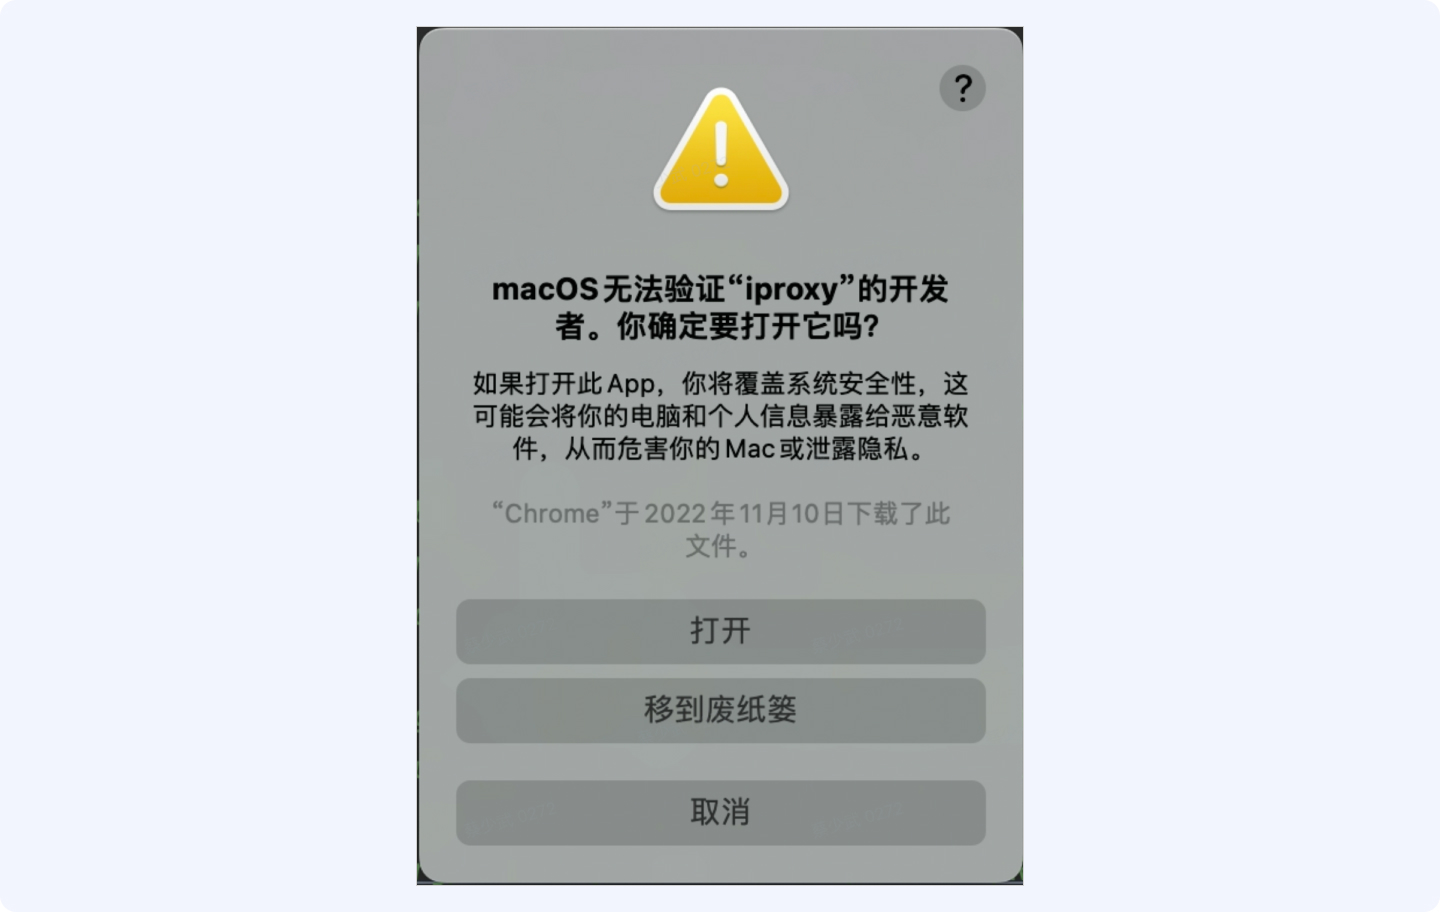
- 切换平台调试时,建议执行
flutter clean清理环境,避免异常问题。
比如说,先用 Android 调试后,执行 flutter clean 后,再使用 设备进行调试。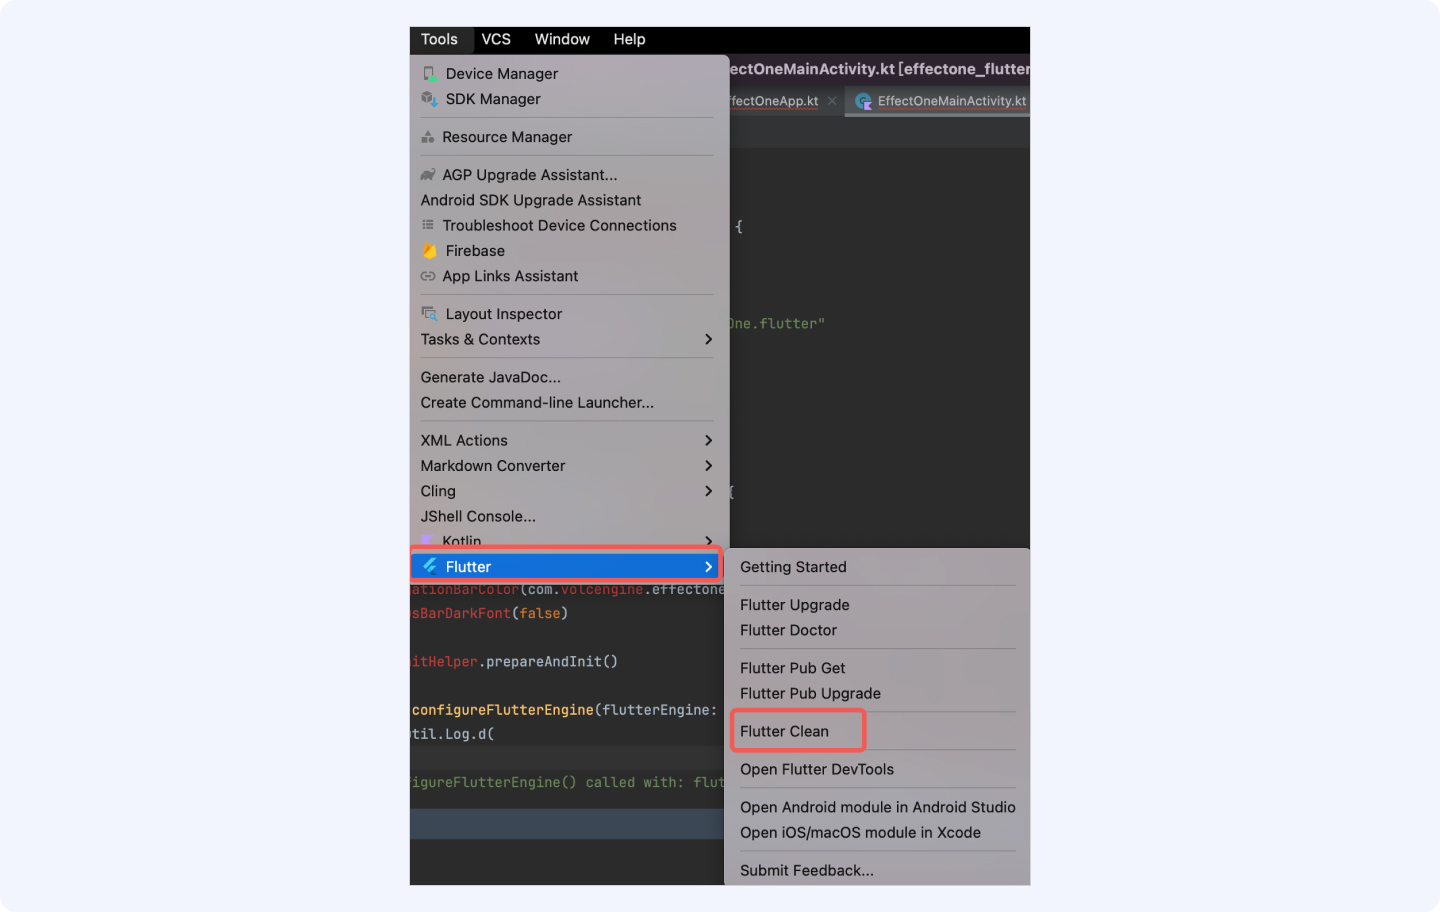
Android
启动后提示鉴权无效
- 排查鉴权文件和applicationId是否匹配一致

- CKApplication配置文件中的授权文件名称是否正确
使用道具无效果情况.
优先检查鉴权文件情况(问题1)
检查导入的剪辑素材和拍摄素材是否和鉴权以及applicationId匹配一致
以上都无问题的情况下, 提供一个控制台的打印日志
添加到您的应用程序的默认配置中,以强制解决将应用程序的 Target 和 Compile SDK 版本设置为 30 的冲突

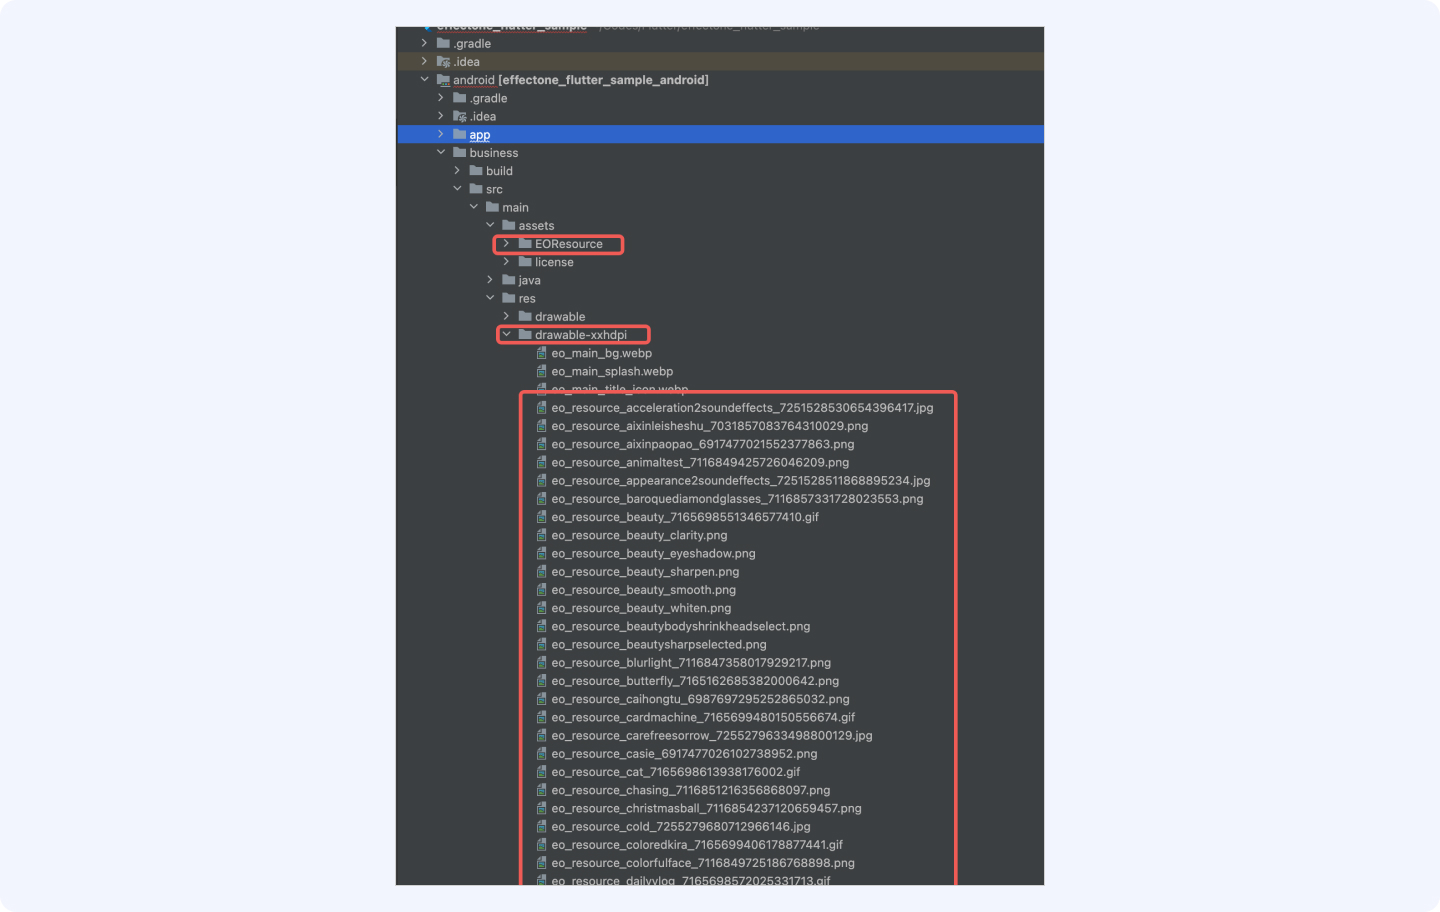
替换素材:
把素材放到以下目录中即可: