智能视频创作SDK
智能视频创作SDK


文档指南

请输入


- 文档首页
 智能视频创作SDK1.7.0SDK接入指引【iOS】接入指南其它语言接入FlutterSwift版本

Swift版本
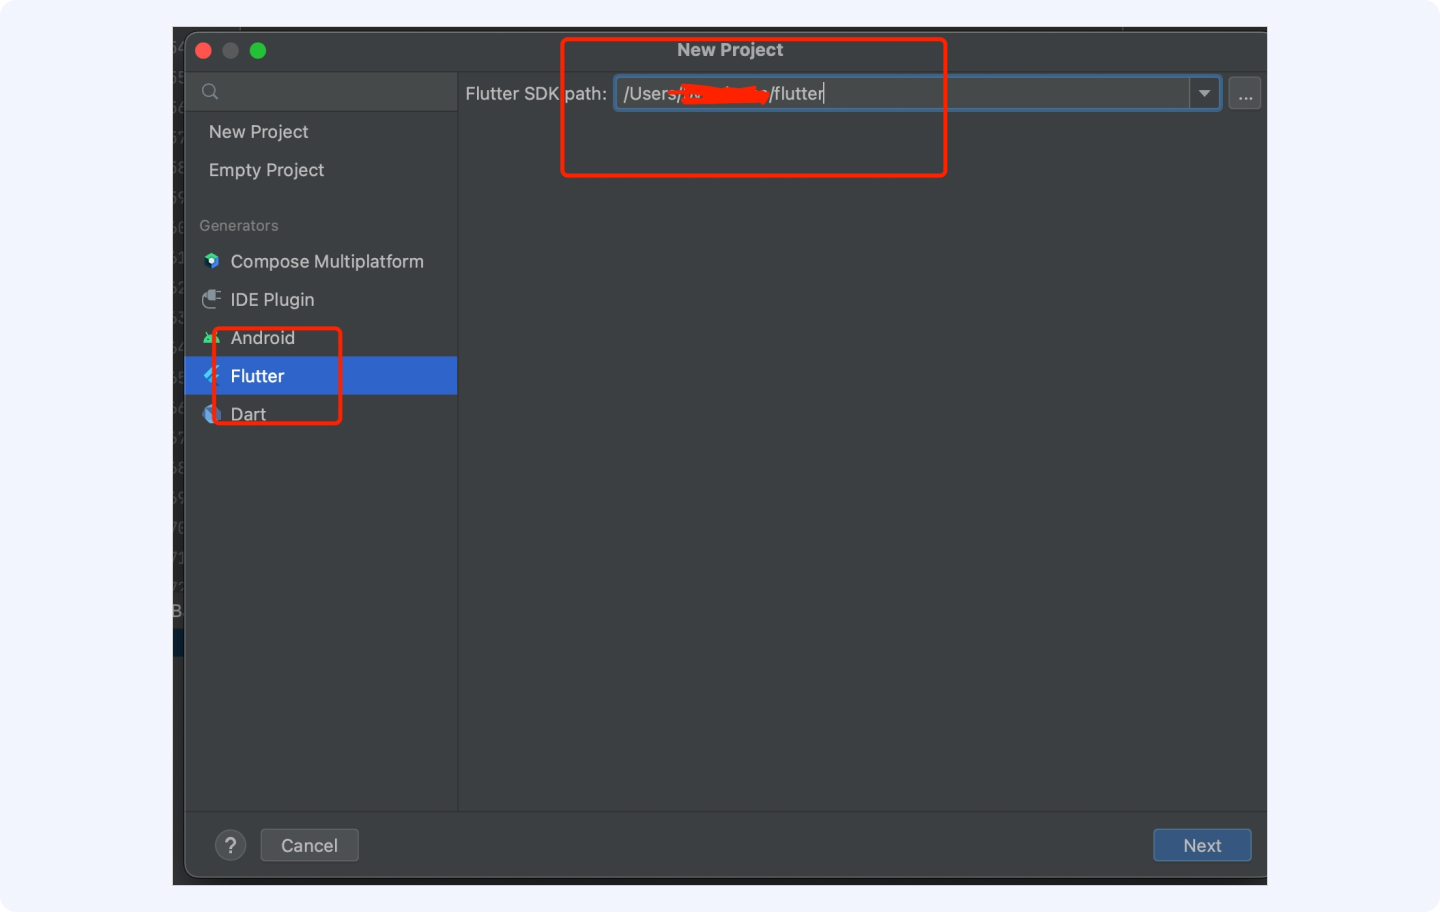
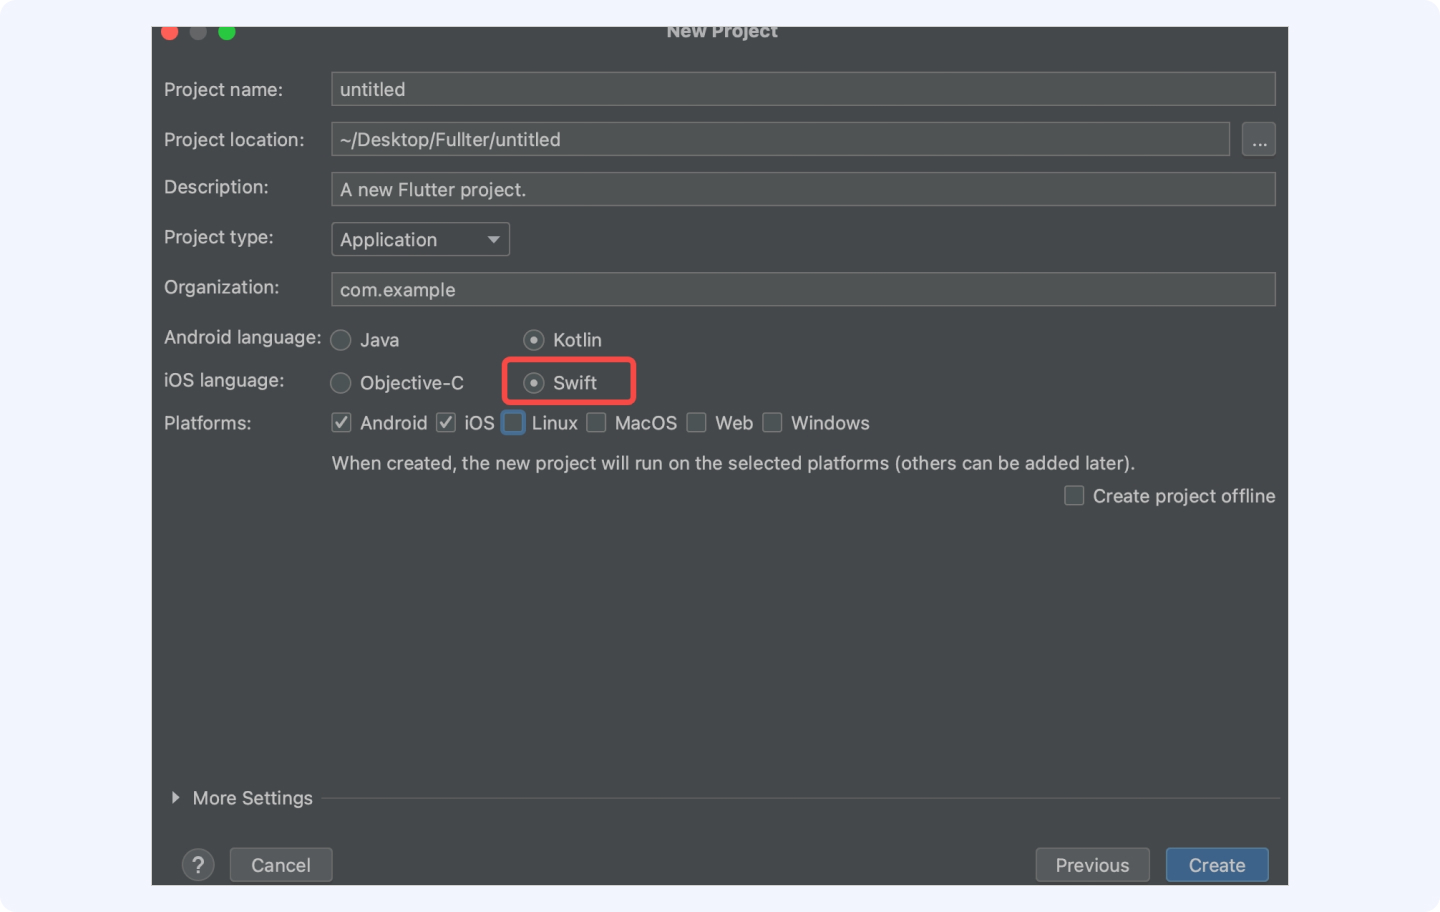
1 创建flutter工程
打开Android Studio 开发工具,点击菜单栏的File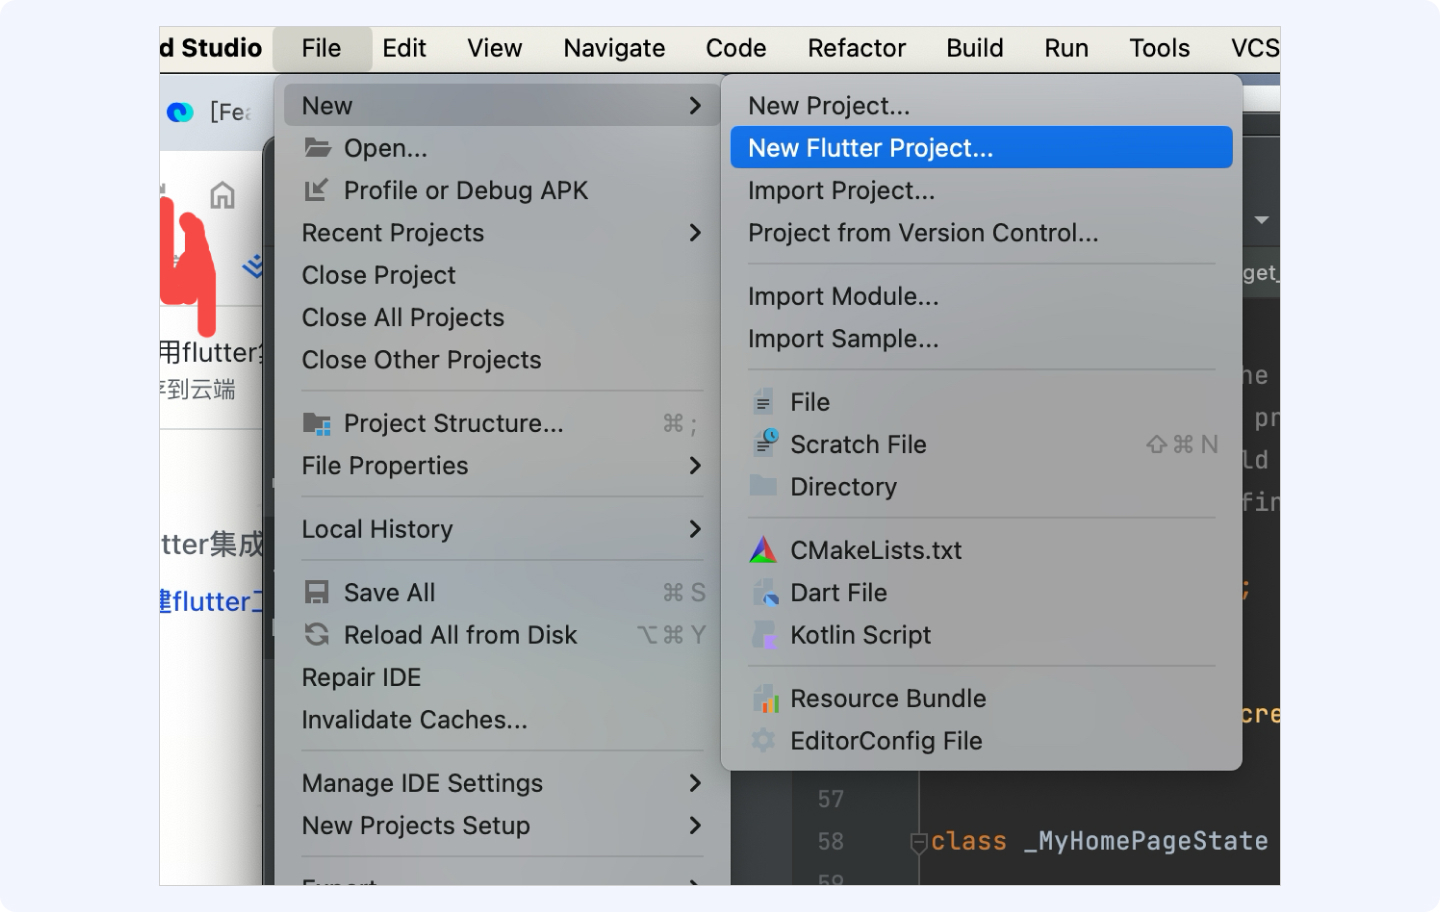
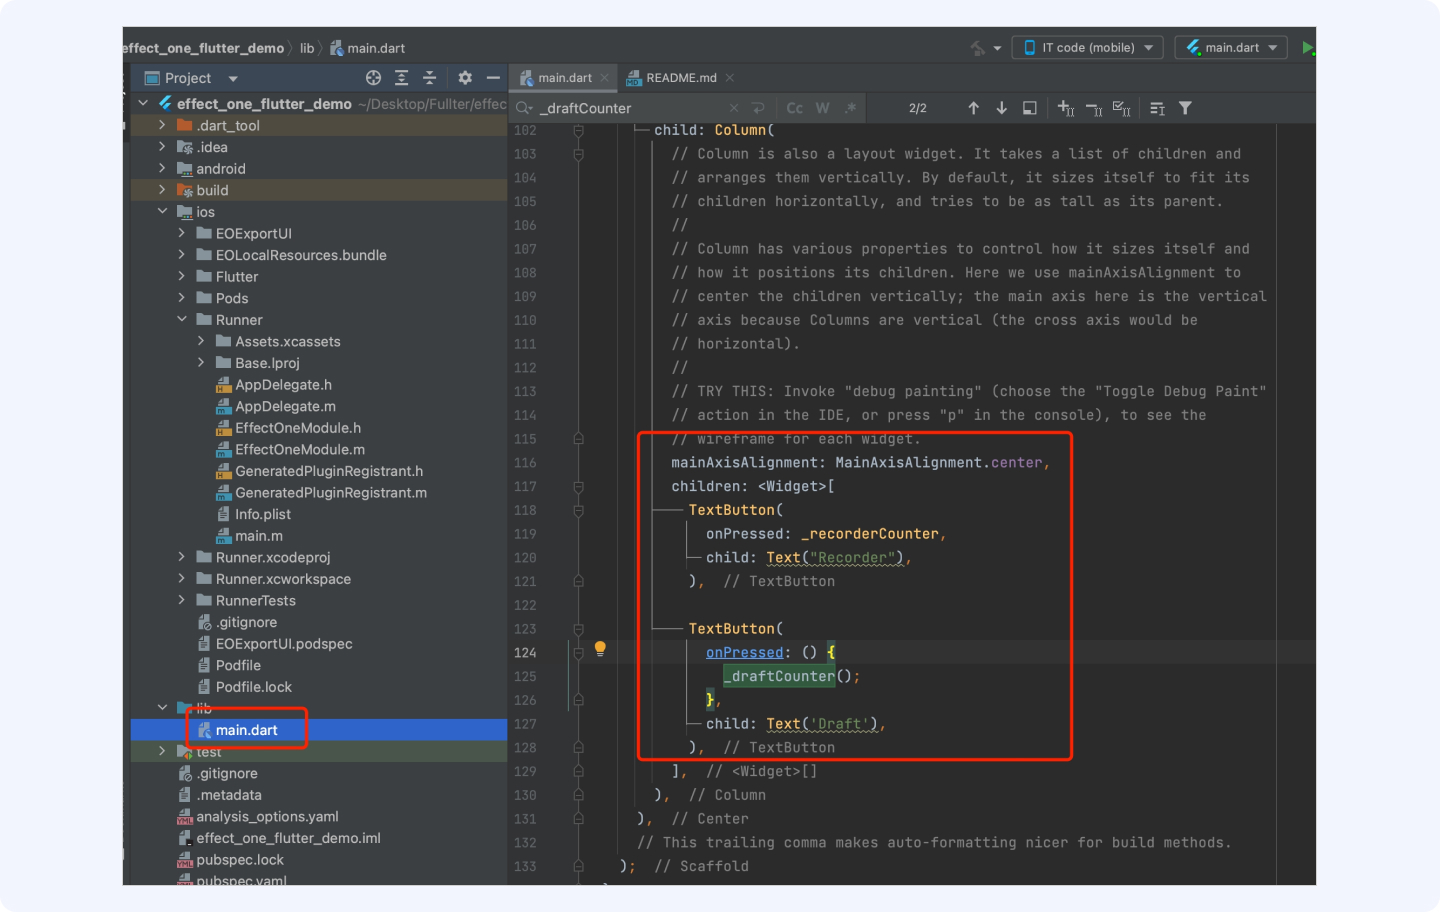
2 添加拍摄及草稿箱按钮
2.1 在flutter项目中main.dart中添加按钮,如下图所示
2.2 构建flutter与原生通信模型
通道命名为:effectOne.flutter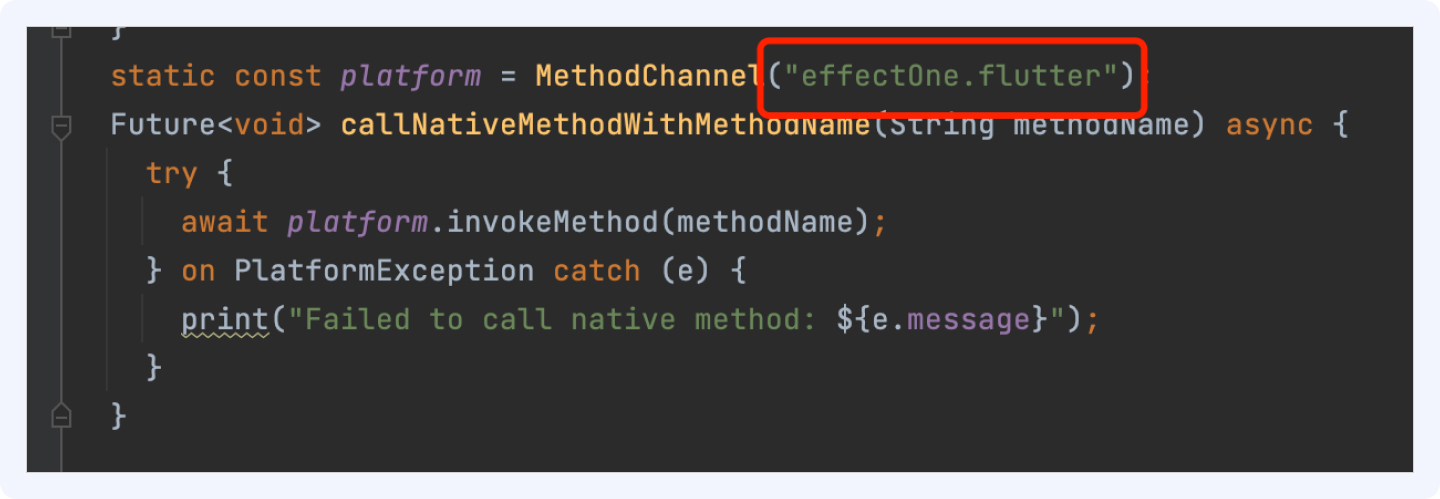
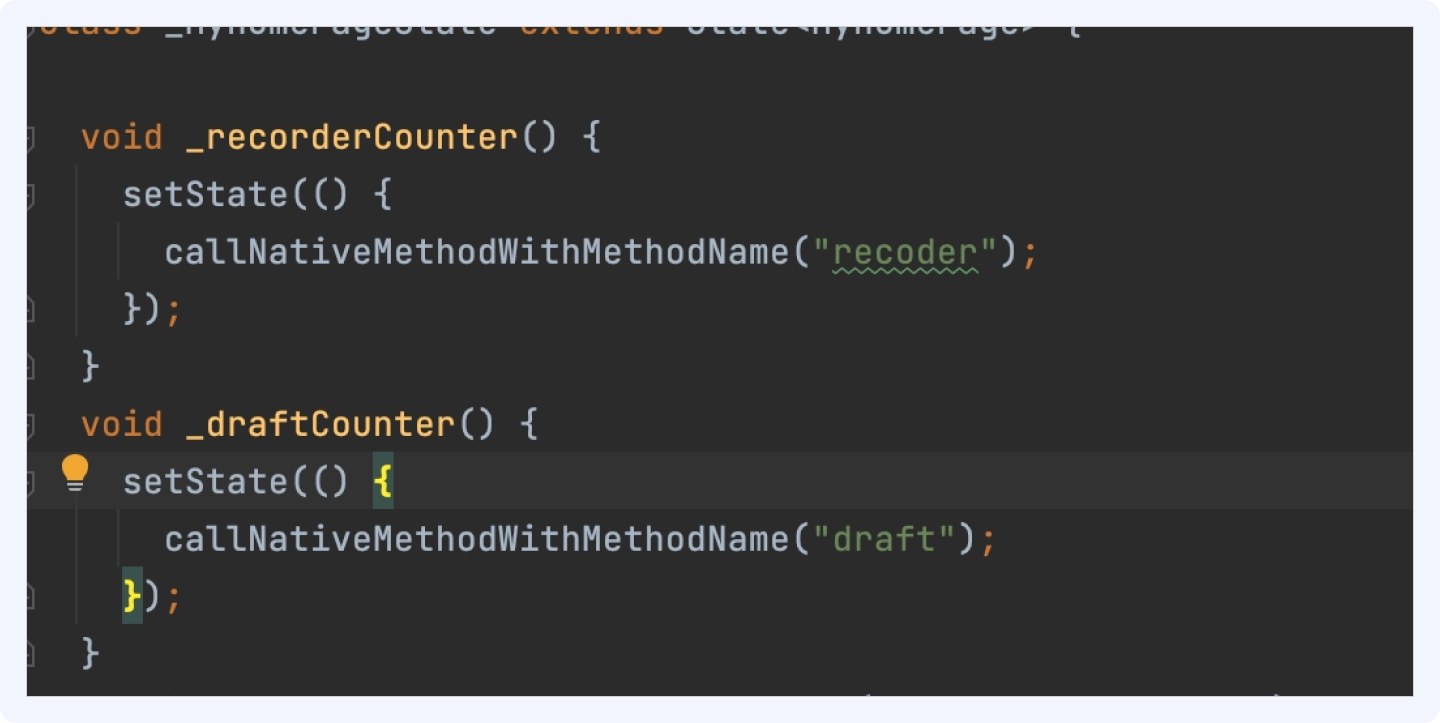
2.3 添加通信交互
2.4 main.dart 代码参考
import 'package:flutter/material.dart';
import 'package:flutter/services.dart';

void main() {
  runApp(const MyApp());
}

class MyApp extends StatelessWidget {
  const MyApp({super.key});

  // This widget is the root of your application.
  @override
  Widget build(BuildContext context) {
    return MaterialApp(
      title: 'Flutter Demo',
      theme: ThemeData(
        colorScheme: ColorScheme.fromSeed(seedColor: Colors.deepPurple),
        useMaterial3: true,
      ),
      home: const MyHomePage(title: 'Flutter Demo Home Page'),
    );
  }
}

class MyHomePage extends StatefulWidget {
  const MyHomePage({super.key, required this.title});

  final String title;

  @override
  State<MyHomePage> createState() => _MyHomePageState();
}

class _MyHomePageState extends State<MyHomePage> {

  void _recorderCounter() {
    setState(() {
      callNativeMethodWithMethodName("recoder");
    });
  }
  void _draftCounter() {
    setState(() {
      callNativeMethodWithMethodName("draft");
    });
  }
  static const platform  = MethodChannel("effectOne.flutter");
  Future<void> callNativeMethodWithMethodName(String methodName) async {
    try {
      await platform.invokeMethod(methodName);
    } on PlatformException catch (e) {
      print("Failed to call native method: ${e.message}");
    }
  }

  @override
  Widget build(BuildContext context) {

    return Scaffold(
      appBar: AppBar(
        // TRY THIS: Try changing the color here to a specific color (to
        // Colors.amber, perhaps?) and trigger a hot reload to see the AppBar
        // change color while the other colors stay the same.
        backgroundColor: Theme.of(context).colorScheme.inversePrimary,
        // Here we take the value from the MyHomePage object that was created by
        // the App.build method, and use it to set our appbar title.
        title: Text(widget.title),
      ),

      body: Center(
        // Center is a layout widget. It takes a single child and positions it
        // in the middle of the parent.

        child: Column(

          mainAxisAlignment: MainAxisAlignment.center,
          children: <Widget>[
            TextButton(
              onPressed: _recorderCounter,
              child: Text("Recorder"),
            ),

            TextButton(
              onPressed: () {
                _draftCounter();
              },
              child: Text('Draft'),
            ),
          ],
        ),
      ),
      // This trailing comma makes auto-formatting nicer for build methods.
    );
  }
}
3、 iOS工程配置
3.1 添加依赖资源
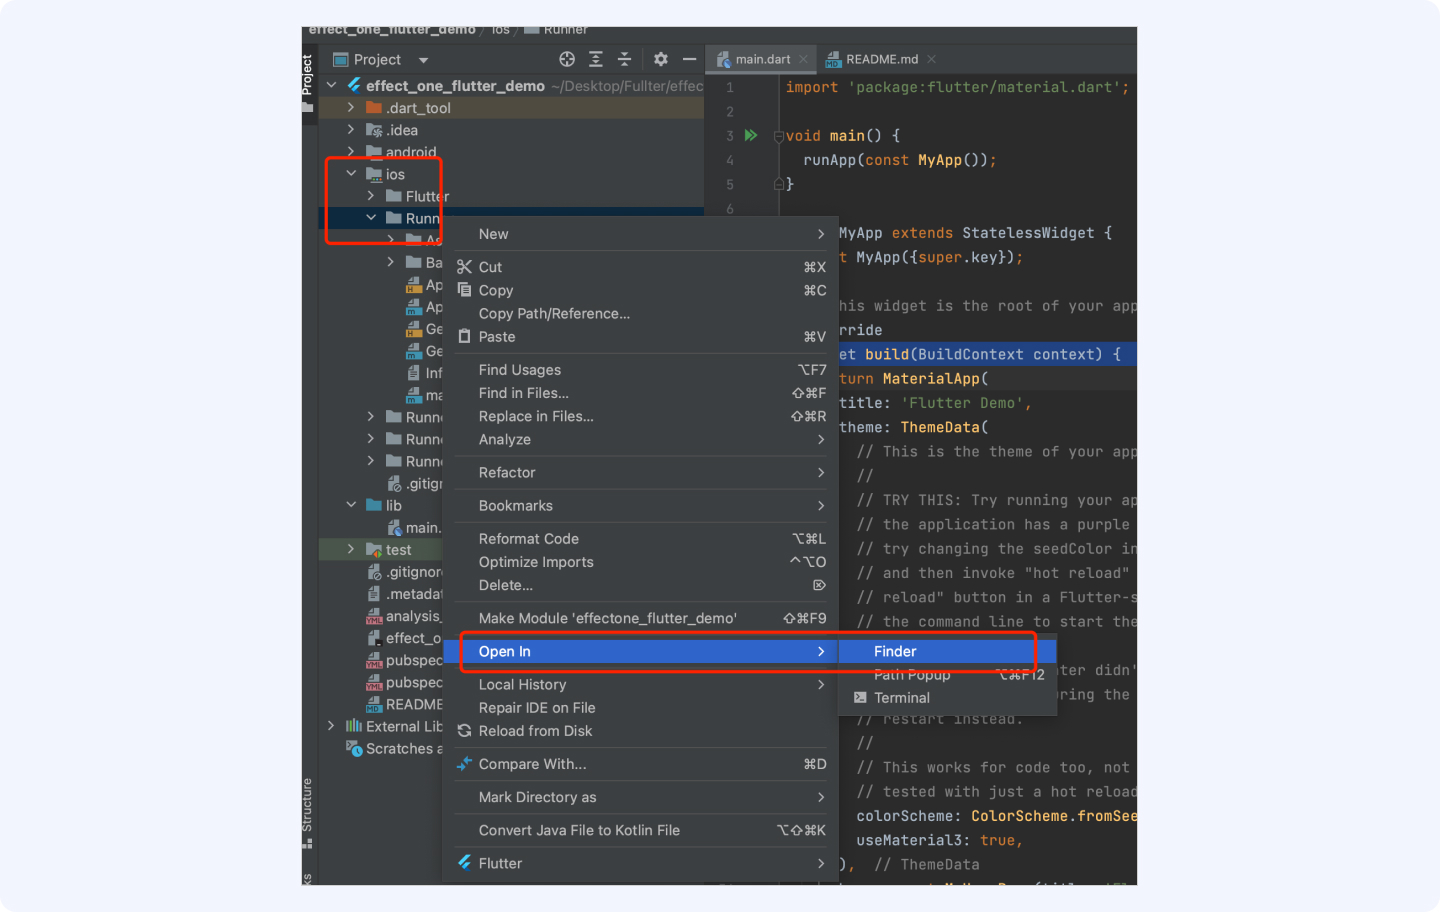
3.1.1 打开iOS工程所在文件位置
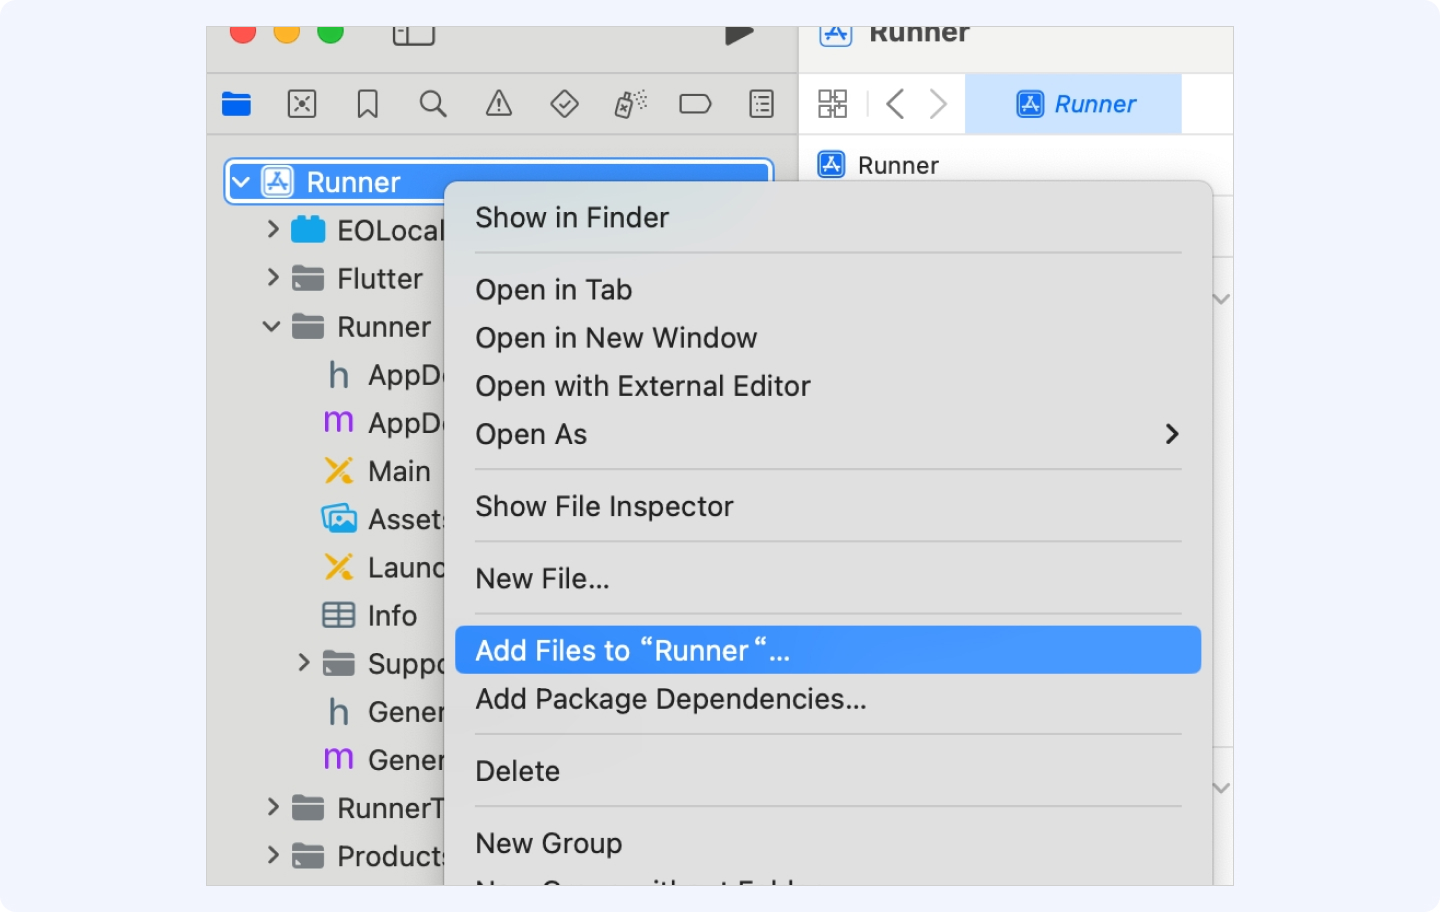
3.1.2 将依赖的文件拖进iOS工程目录下
将demo中以下三个文件拖进iOS工程目录下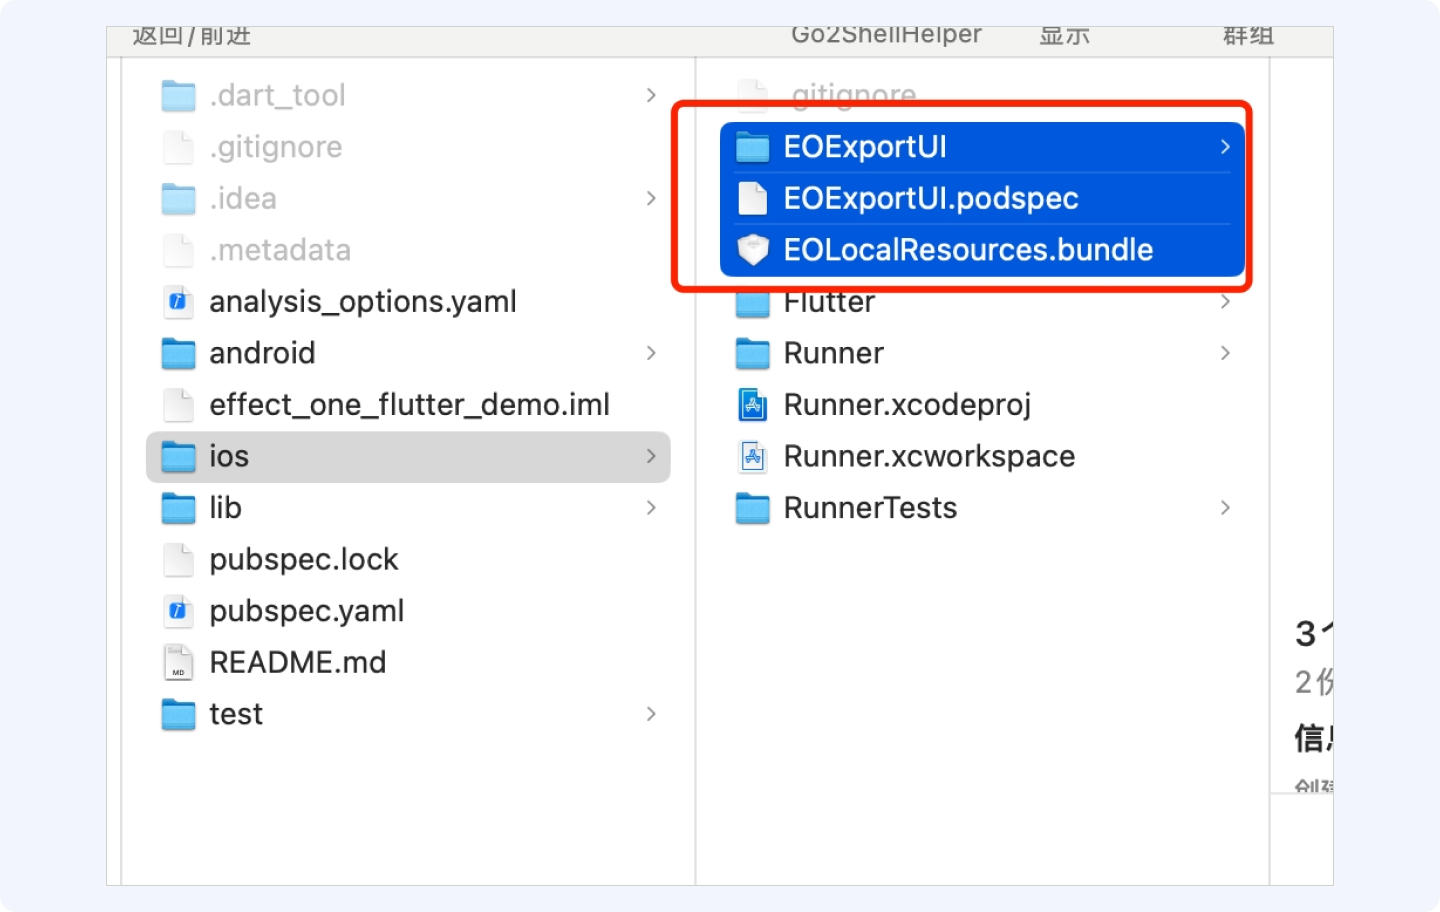
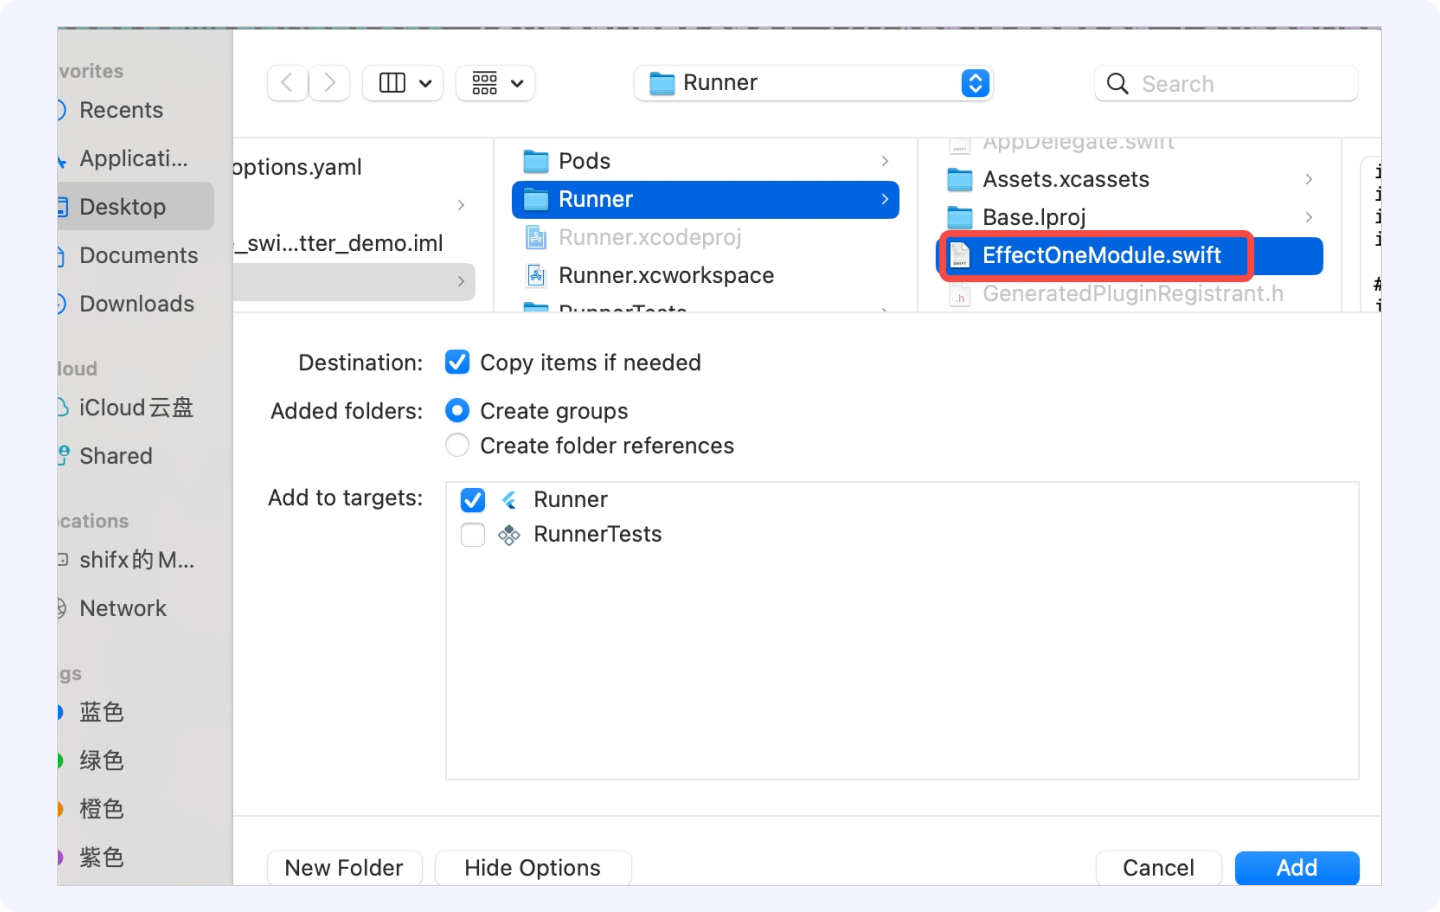
将demo中的EffectOneModule.swift文件拖进Runner文件下
3.1.3 添加podFile文件
打开终端并cd到iOS工程所在目录
在终端cd到iOS工程所在目录后执行命令:pod init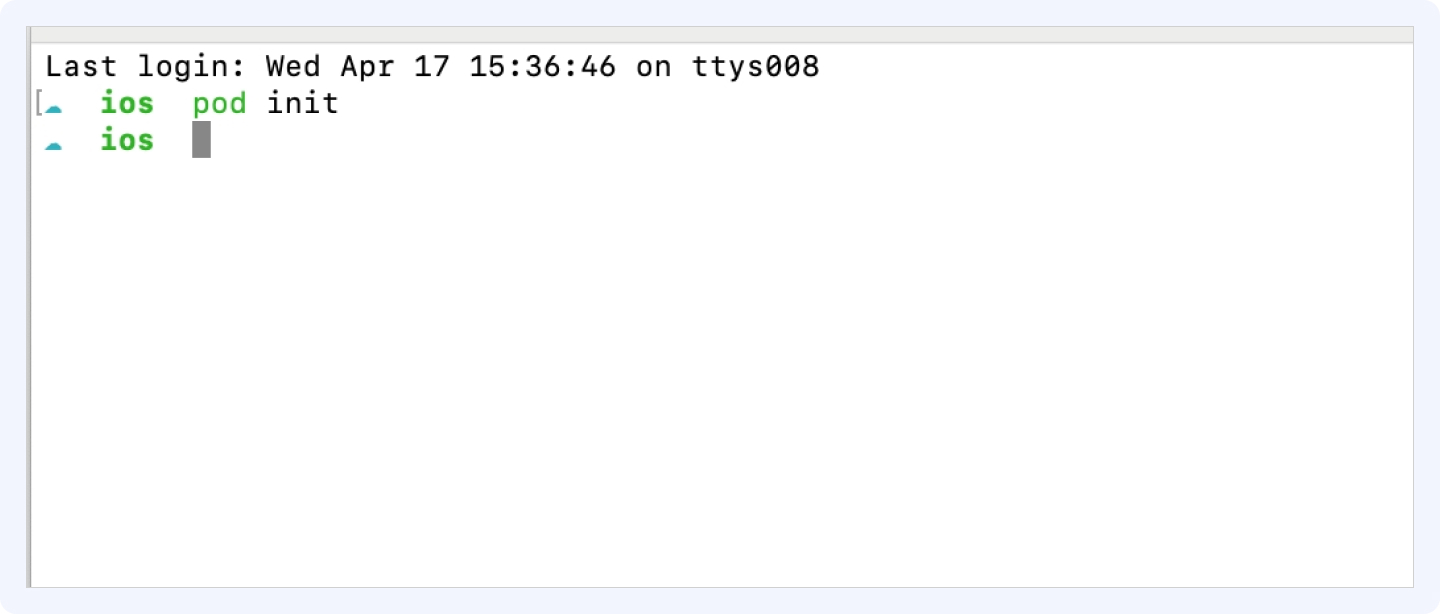
执行完成后,iOS工程目录增加了个podFile文件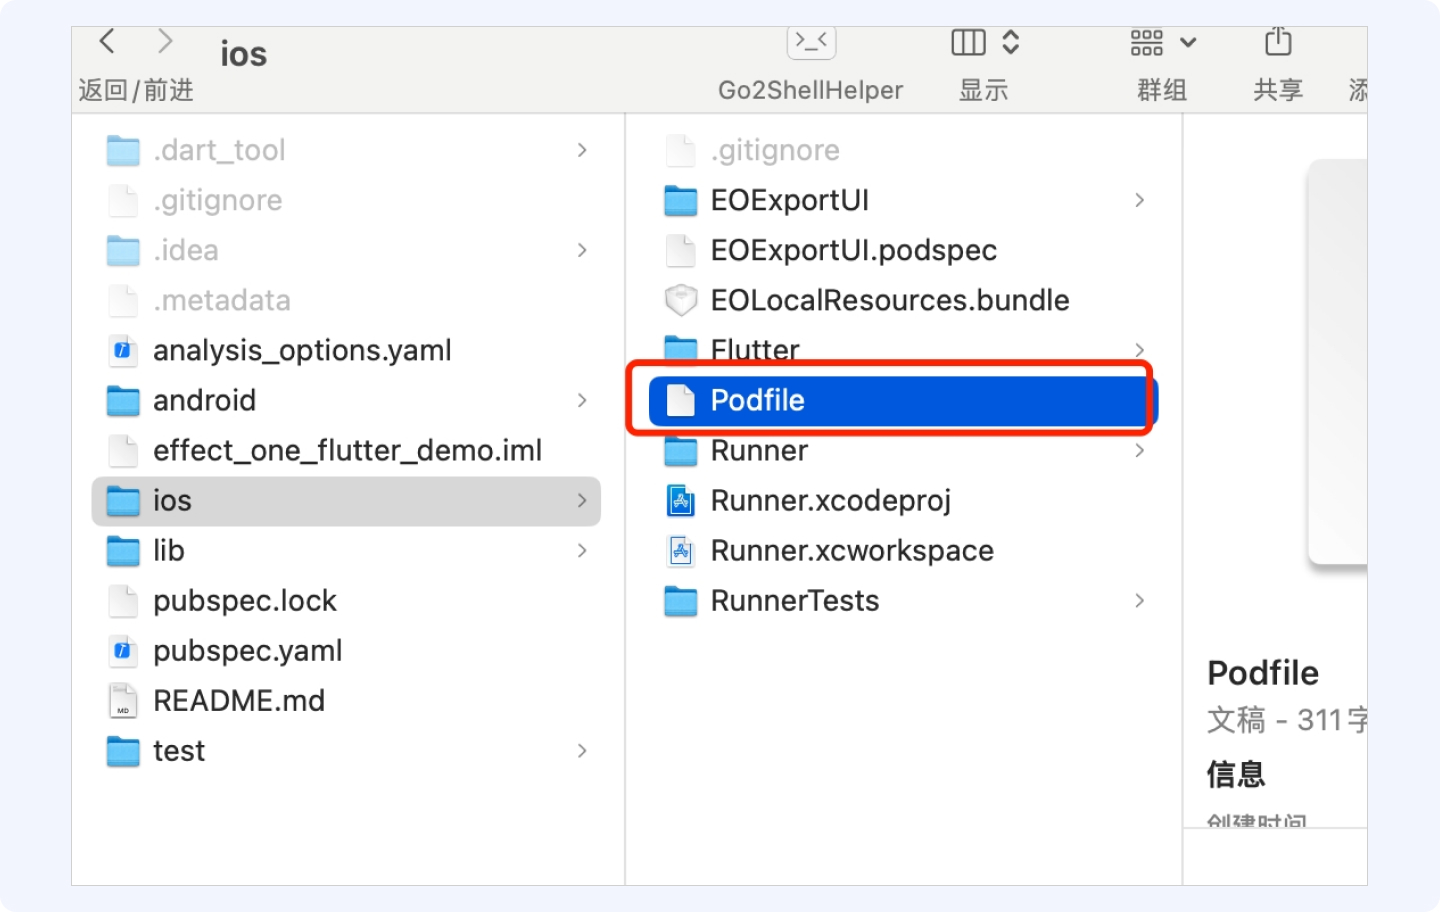
3.1.4 修改podFile文件
双击打开podFile文件,添加资源地址以及Pod配置
source 'https://github.com/CocoaPods/Specs.git'
source 'https://cdn.cocoapods.org/'
source 'https://github.com/volcengine/volcengine-specs.git'

install! 'cocoapods', :generate_multiple_pod_projects => true,
                      :deterministic_uuids => false,
#                      :incremental_installation => true,
                      :preserve_pod_file_structure => true

$EFFECT_ONE_KEY = "EffectOneKit"
添加依赖库资源
pod 'EOExportUI', :path => './'
pod 'EffectOneKit', '1.0.0', :source => 'https://github.com/volcengine/volcengine-specs'
添加结果下图所示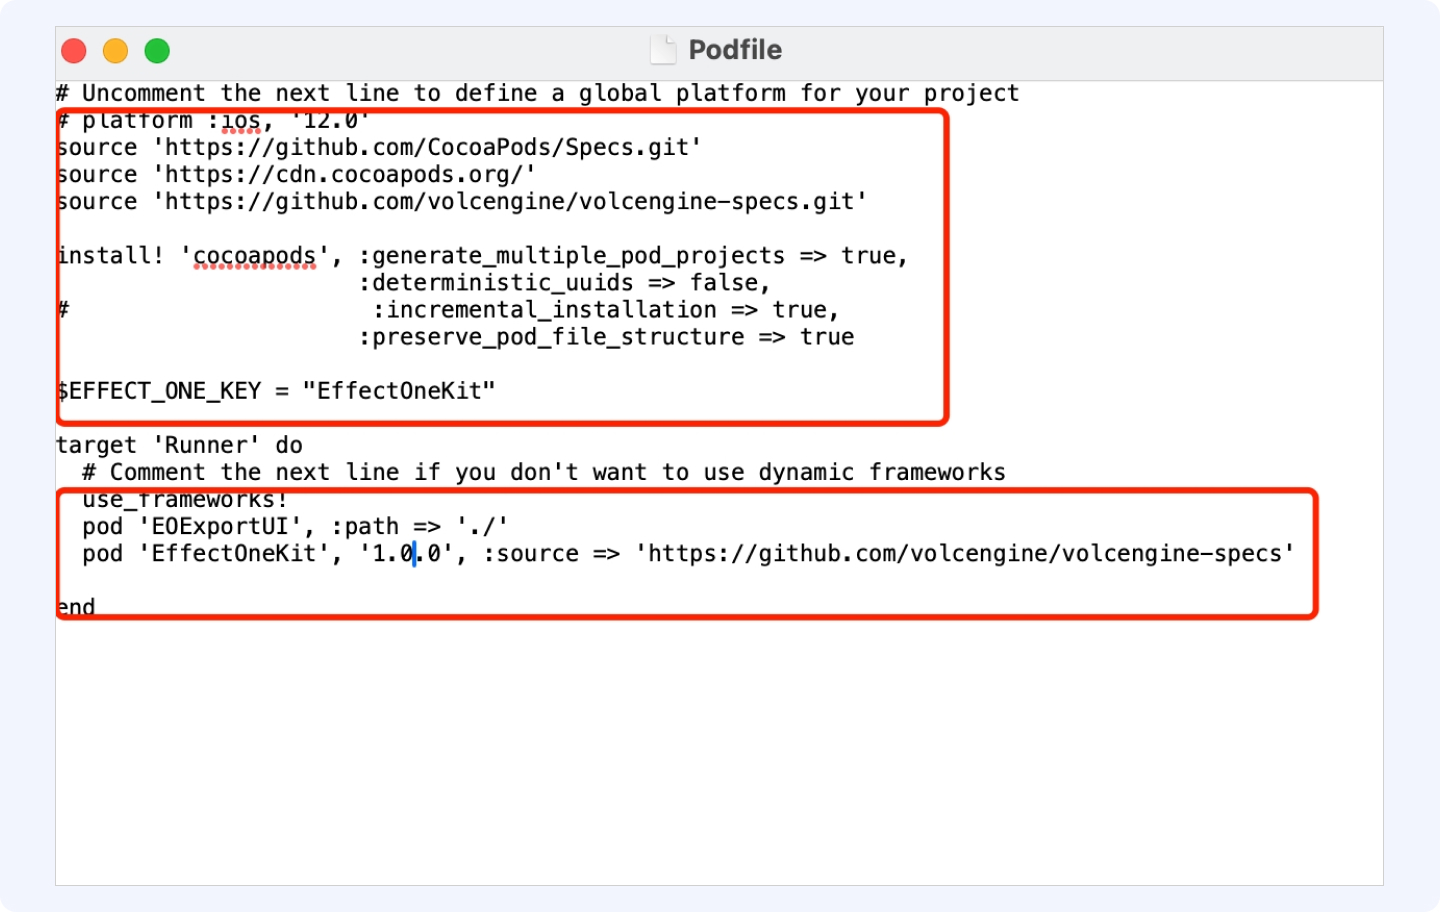
3.1.5 终端执行pod install 命令
依然在终端打开iOS工程所在的目录,并执行命令 pod install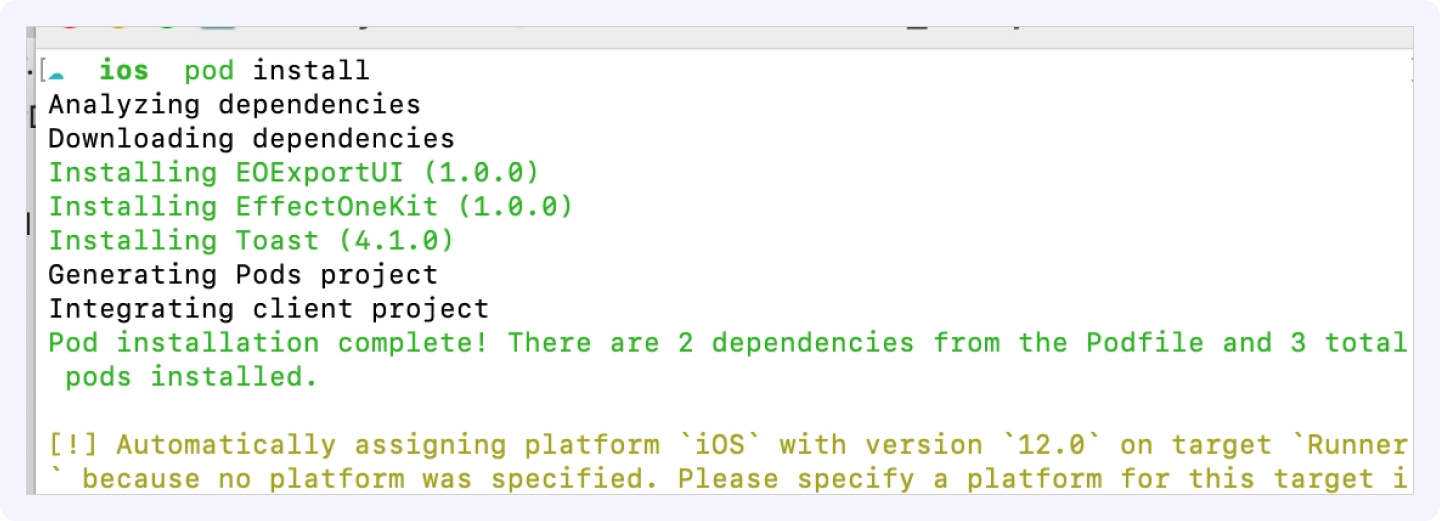
等待执行成功。
3.2 iOS工程配置
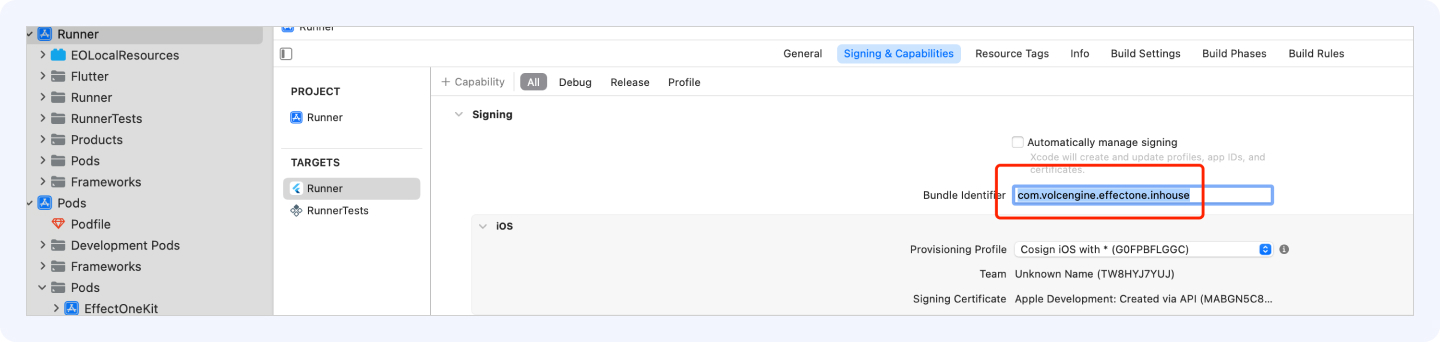
3.2.1 配置bundle Id
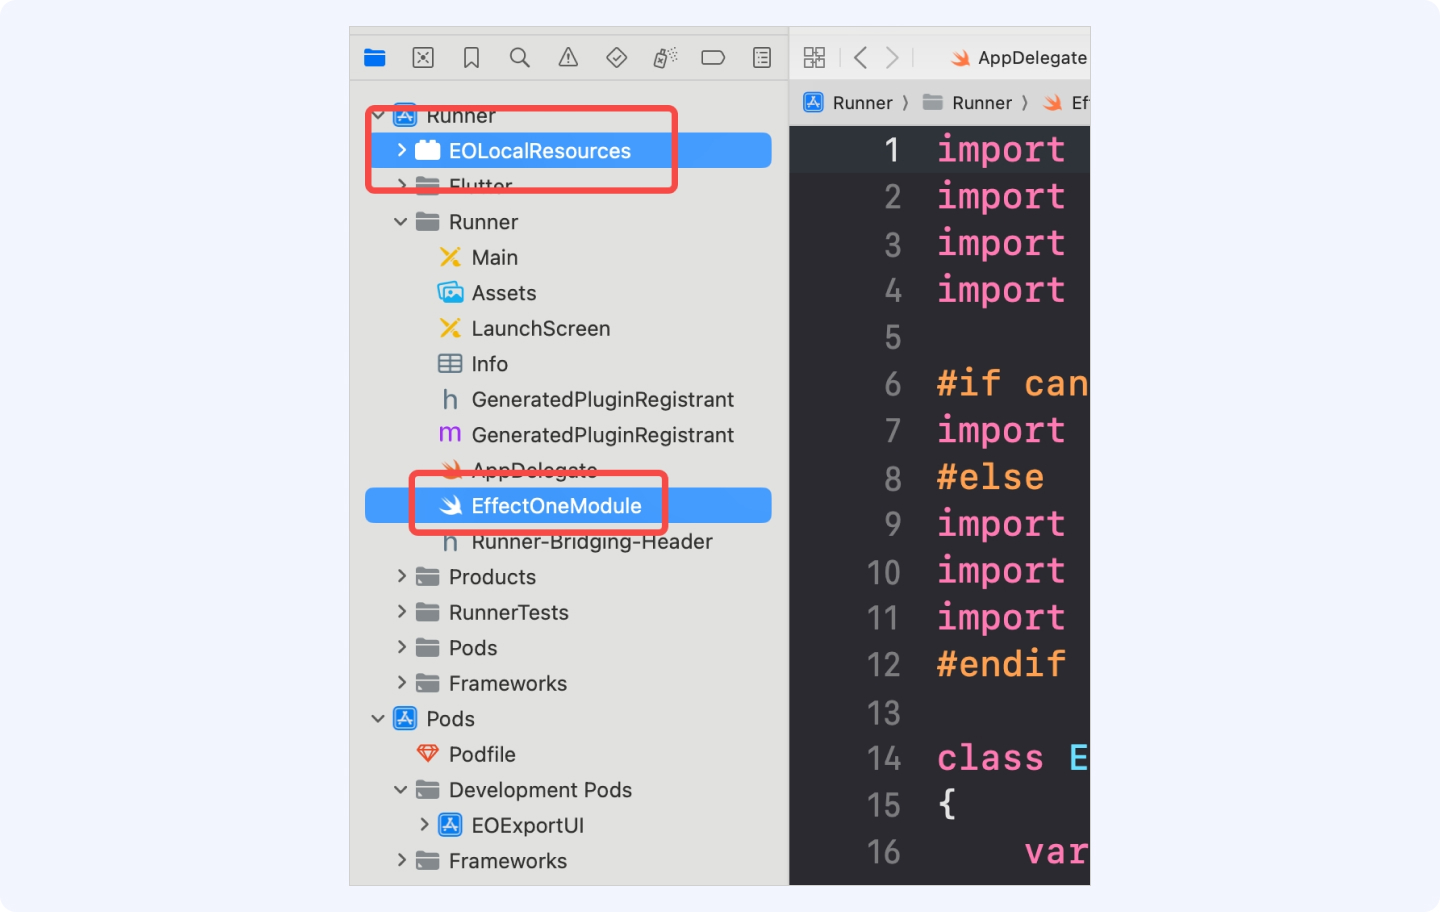
3.2.2 将步骤 3.1.2中的EOLocalResources.boudle以及其他文件添加到iOS工程中

添加完成后结果如下
3.3.3 建立与flutter通信通道
在iOS工程中的Appdelete.m文件中添加如下方法
@objc class AppDelegate: FlutterAppDelegate {
    private lazy var effectOneModule = _creatEffectOneModule()
    private func _creatEffectOneModule() -> EffectOneModule {
        return EffectOneModule(parentVC: self.window.rootViewController!)
    }
  override func application(
    _ application: UIApplication,
    didFinishLaunchingWithOptions launchOptions: [UIApplication.LaunchOptionsKey: Any]?
  ) -> Bool {
      self.effectOneModule.makeAuth()
      let vc = self.window.rootViewController
      let channel = FlutterMethodChannel.init(name: "effectOne.flutter", binaryMessenger: vc as! FlutterBinaryMessenger)
      channel.setMethodCallHandler { [weak self] (call: FlutterMethodCall, result: @escaping FlutterResult) in

          if call.method == "recoder" {
              self?.effectOneModule.showRecorderViewController()
          } else if call.method == "draft" {
              self?.effectOneModule.showDraftViewController()
          }
      }

    GeneratedPluginRegistrant.register(with: self)
    return super.application(application, didFinishLaunchingWithOptions: launchOptions)
  }
}
如图所示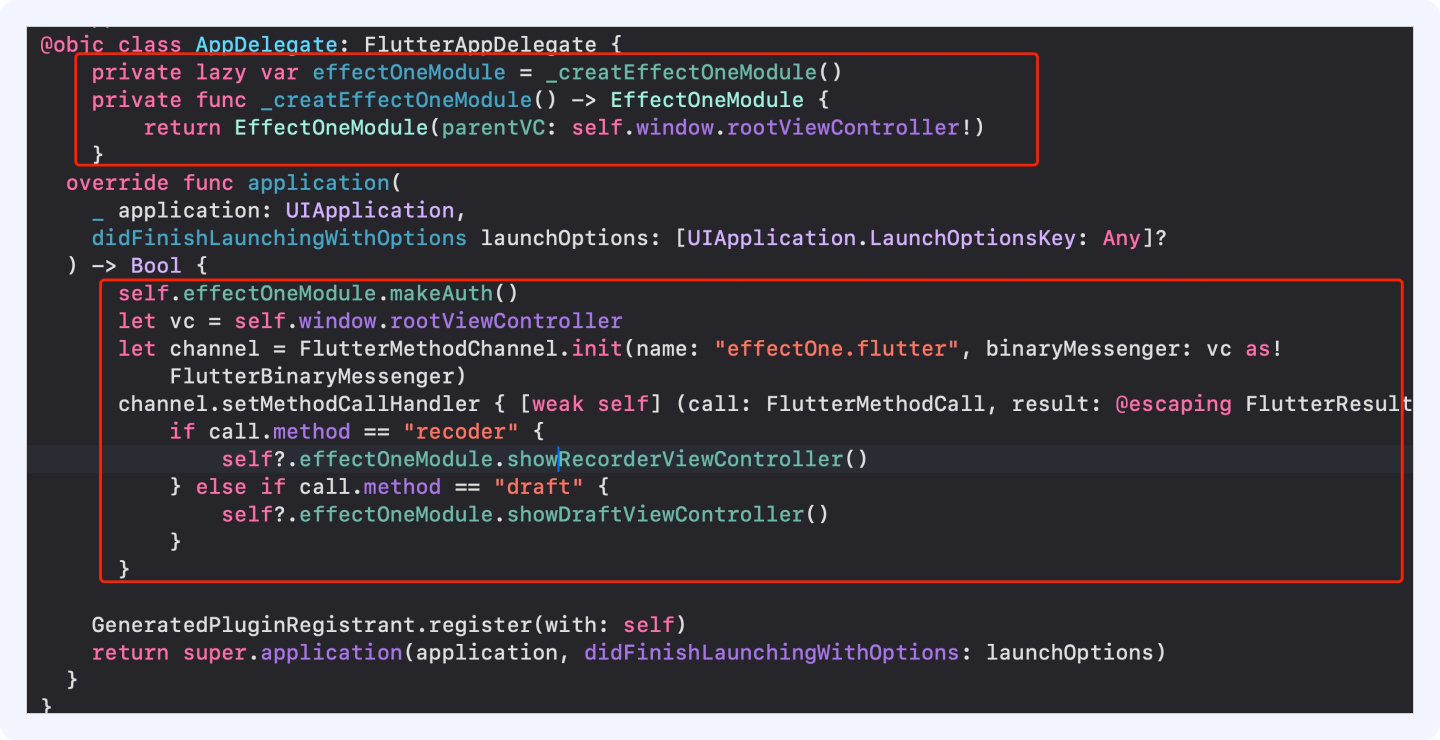
3.3.4 添加鉴权以及拉起拍摄和草稿箱方法
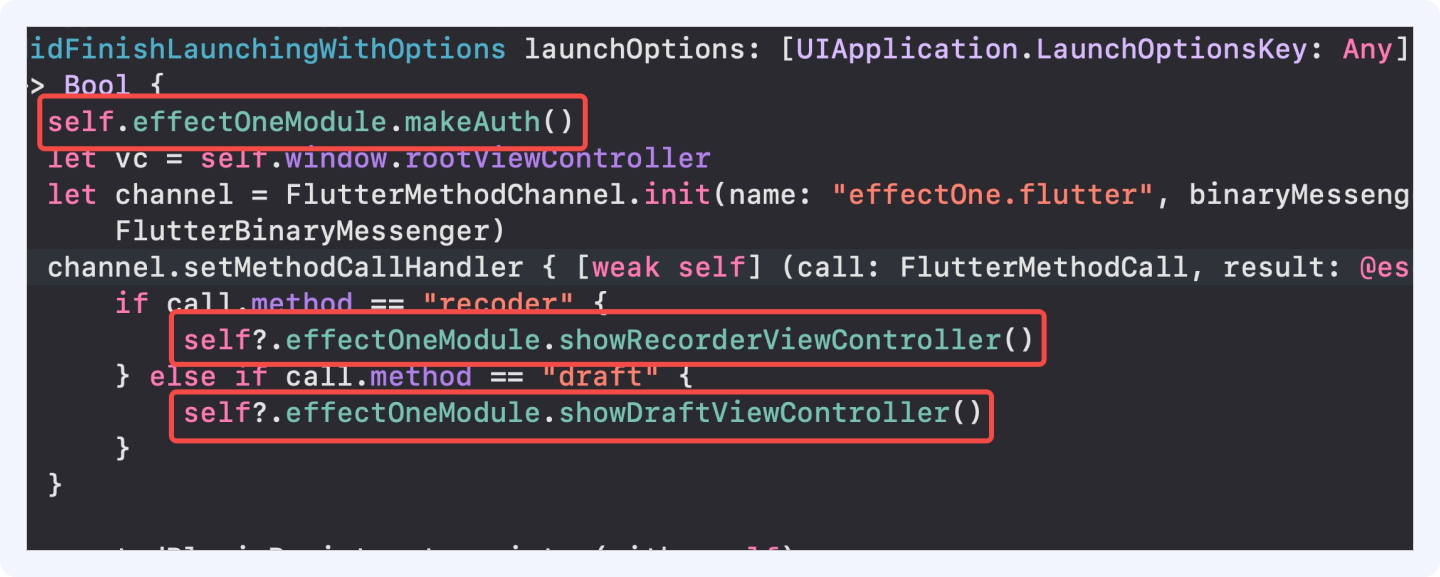
注意:通道name一定要和flutter工程中的一致,即effectOne.flutter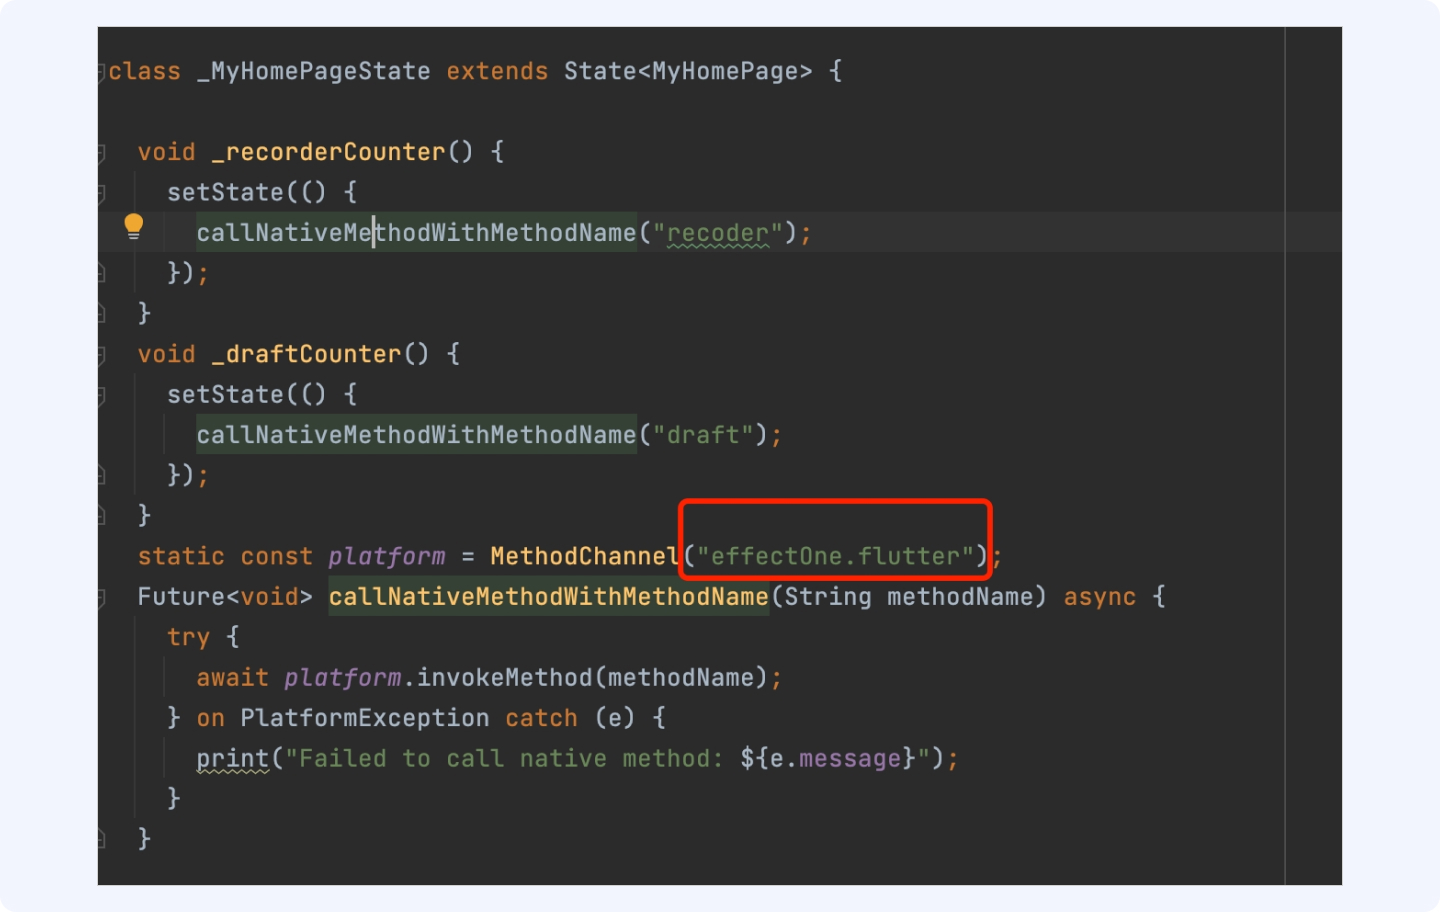

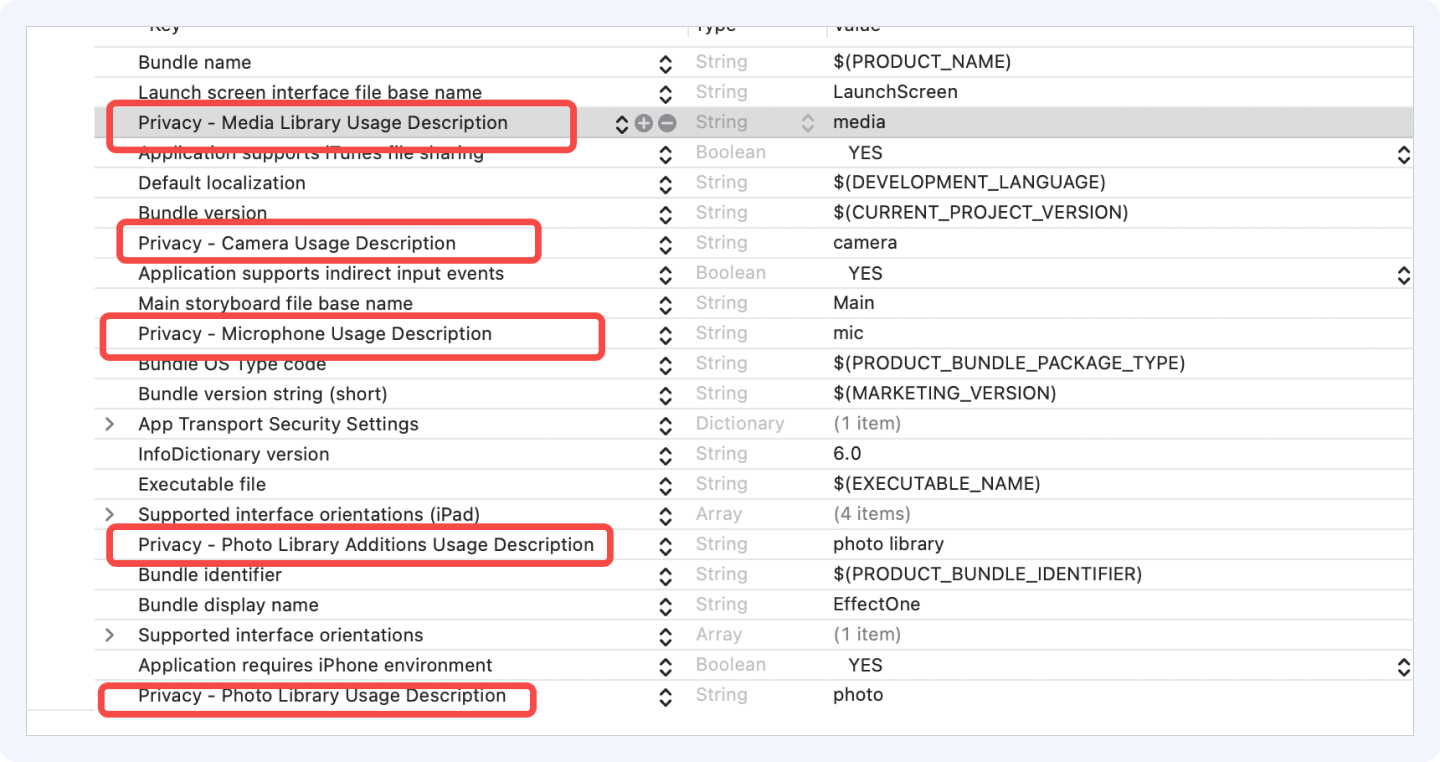
3.3.5 权限配置
在工程配置Info中配置相机、麦克风及相册访问权限
- EffectOneKit依赖了相机、麦克风及相册访问权限,需要在你的工程配置中开启,如下图
//是否允许App访问您的媒体资料库
<key>NSAppleMusicUsageDescription</key>
<string>media</string>//写出自己说明描述
//是否允许App使用您的相机
<key>NSCameraUsageDescription</key>
<string>Camera</string>//写出自己说明描述
//是否允许App您的麦克风
<key>NSMicrophoneUsageDescription</key>
<string>mic</string>//写出自己说明描述
//是否允许App保存图片到手机
<key>NSPhotoLibraryAddUsageDescription</key>
<string>photo lib</string>//写出自己说明描述
//是否允许App您的相册
<key>NSPhotoLibraryUsageDescription</key>
<string>photo</string>//写出自己说明描述
3.3.6 配置完成
至此,iOS工程配置完成,可以在flutter项目中运行了。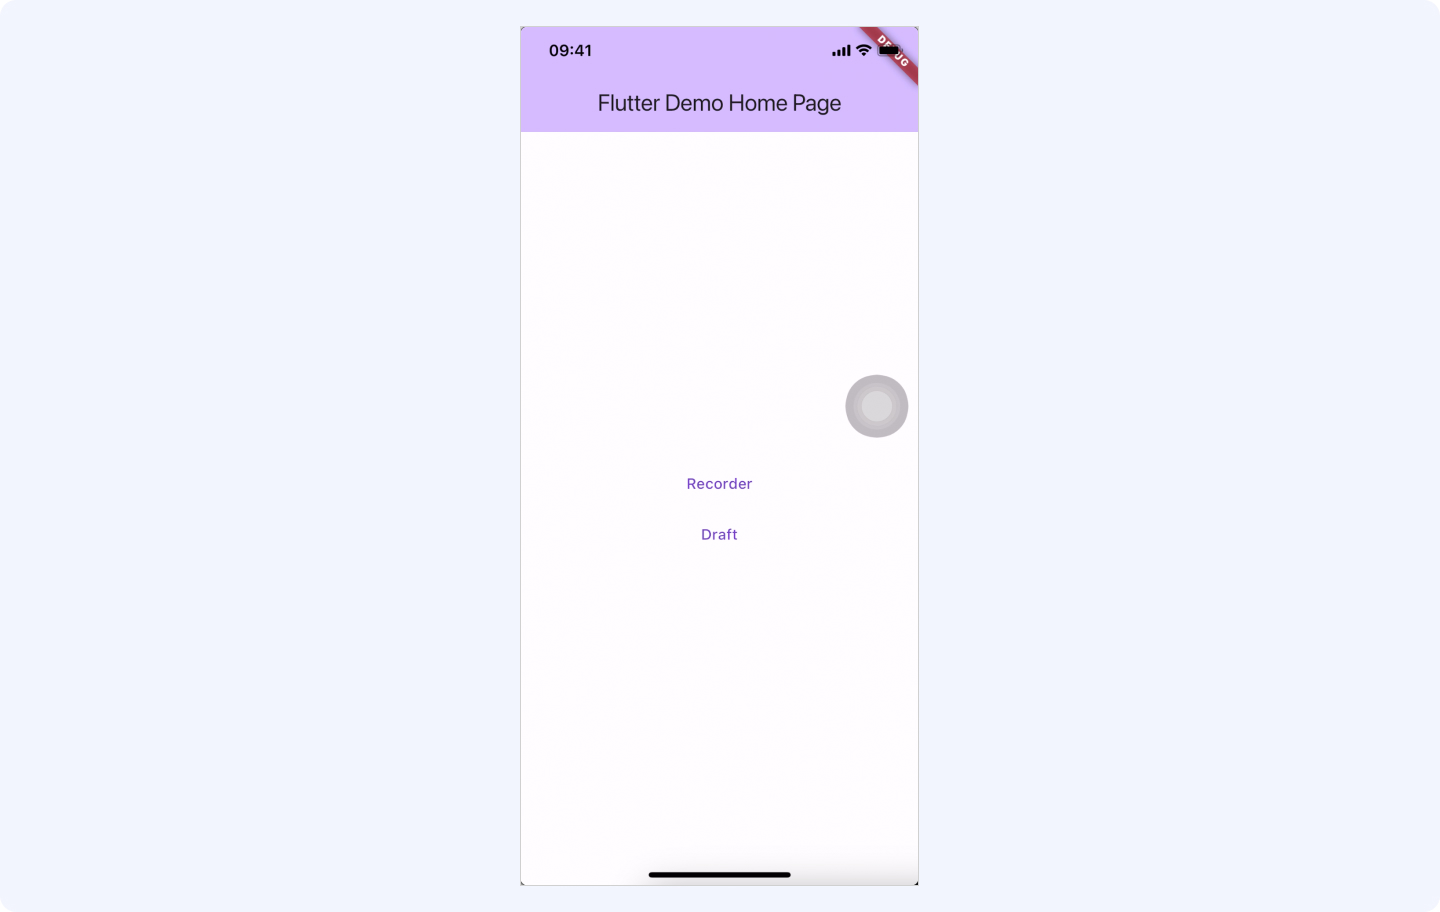
最近更新时间:2025.05.13 16:22:36
这个页面对您有帮助吗?
有用
有用
无用
无用