企业直播
企业直播


aPaaS SDK 参考

请输入


- 文档首页
 企业直播iOS 开播 SDK集成 iOS 开播 SDK

集成 iOS 开播 SDK
开播 SDK 提供录屏直播和视频直播两大功能。本文介绍如何将开播 SDK 集成到您的 iOS App 中。
前提条件
- 您已开通旗舰版或尊享版套餐。详见计费说明。
- iOS 12.0 及以上版本的真机。
- 安装 Xcode,建议使用最新版本。
- 安装 CocoaPods,建议使用 1.11.0 或更高版本。可参考 Getting Started with CocoaPods。
- CPU 架构:arm64。
- 获取直播 License 文件、创建 SDK 应用时填写的 App 名称以及应用创建后生成的 App ID。详见获取 License。
- 如果您需要使用美颜、滤镜和道具贴纸功能,联系企业直播技术支持获取计算机视觉(CV)License 以及资源包。
集成步骤
步骤一:添加依赖
在项目的
Podfile文件中添加依赖。说明
如果您的项目尚未使用过 CocoaPods,在项目的根目录下,执行
pod init && pod install命令,可以得到Podfile文件。source 'https://cdn.cocoapods.org/' source 'https://github.com/volcengine/volcengine-specs.git' # 您 App Target 的名字 target 'XXXX' do # 只集成开播 SDK # 如需优化包体积,可将 LiveStreaming 替换为 LiveStreamingWithoutRTC 集成不包含录屏直播功能的开播 SDK pod'BDLive', '1.66.1', :subspecs => [ 'LiveStreaming', ] # 同时集成开播 SDK 和观播 SDK # 如需优化包体积,可将 LiveStreaming 替换为 LiveStreamingWithoutRTC 集成不包含录屏直播功能的开播 SDK,将 Viewer 替换为 ViewerWithoutRTC 集成不包含超低延时直播以及观众连麦功能的观播 SDK pod'BDLive', '1.66.1', :subspecs => [ 'LiveStreaming', 'Viewer', ] end打开终端窗口,执行
cd命令进入您的项目目录。执行pod install命令安装依赖。
使用静态库版本的 TTSDK
默认使用动态库版本的 TTSDK。如需使用静态库版本的 TTSDK,在添加依赖时,在版本号后添加 -static-ttsdk。详见上述 Podfile 文件配置。
# 只集成开播 SDK
  pod'BDLive', '1.66.1-static-ttsdk', :subspecs => [
    'LiveStreaming',
  ]

  # 同时集成开播 SDK 和观播 SDK
  pod'BDLive', '1.66.1-static-ttsdk', :subspecs => [
    'LiveStreaming',
    'Viewer',
  ]
步骤二:配置环境
在 Xcode 的 App Target 下,完成以下操作:
打开
info.plist文件并通过以下任一方式添加权限:- 单击 + 添加 Privacy - Photo Library Usage Description、Privacy - Microphone Usage Description 和 Privacy - Camera Usage Description 作为 Key,选择 String 作为 Type,并输入在系统弹出授权对话框时的提示信息作为 Value。
- 以 Source Code 的方式打开
info.plist文件,并添加以下 key 和 string。您可以自定义 string 的值作为在系统弹出授权对话框时的提示信息。<!-- 相册权限 --> <key>NSPhotoLibraryUsageDescription</key> <string>App 需要获取您的相册权限,用于将本地图片合入直播流</string> <!-- 麦克风权限 --> <key>NSMicrophoneUsageDescription</key> <string>App 需要获取您的麦克风权限,用于采集直播声音</string> <!-- 相机权限 --> <key>NSCameraUsageDescription</key> <string>App 需要获取您的相机权限,用于采集直播视频</string>
如果需要 App 在后台运行时继续录制音频或者需要使用录屏直播功能,需要完成以下步骤:
- 单击 Signing & Capabilities 页签下的 + Capability,并双击添加 Background Modes。
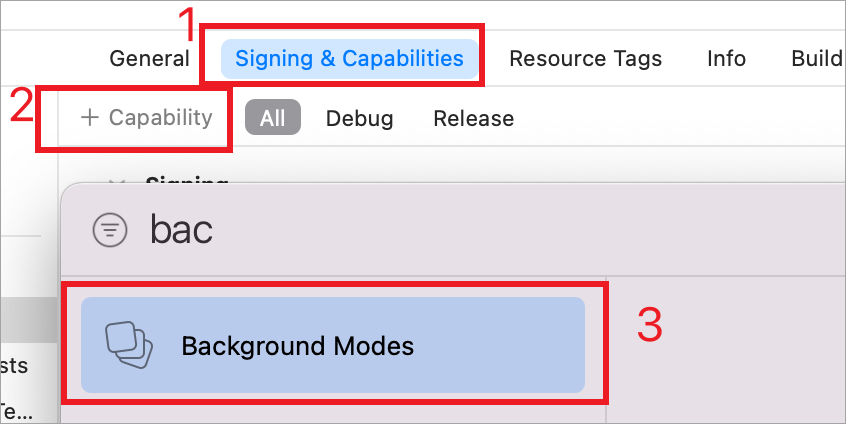
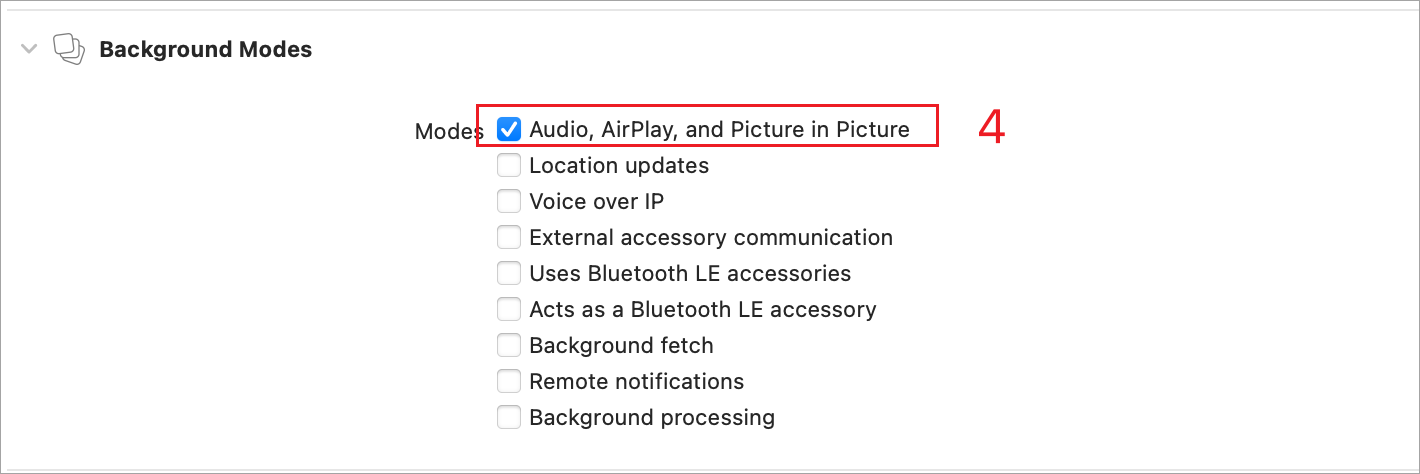
- 在 Background Modes 区域,选择 Audio, AirPlay, and Picture in Picture 复选框。
- 单击 Signing & Capabilities 页签下的 + Capability,并双击添加 Background Modes。
(可选)如果您的项目使用了 Bitcode,需要关闭 Bitcode。
- 单击 Build Settings 页签。
- 在 Build Options 区域,将 Enable Bitcode 置为 No。
设置开播支持的屏幕方向。
- 单击 General 页签。
- 在 Deployment Info 区域,分别选择 iPhone Orientation 和 iPad Orientation 的 Portrait 和 Landscape Right 复选框。
步骤三:导入 License
- 将直播 License 文件添加到 Xcode 的 App Target 中。勾选 Copy items if needed,并单击 Finish。
- (可选)解压缩 CV 资源包(包含 CV License)并将其添加到 Xcode 的 App Target中。在将文件添加至 Target 中时,勾选 Copy items if needed 并单击 Finish。
步骤四:初始化 BDLive
在 Xcode 的 App Target 下,打开 AppDelegate.m 文件初始化 BDLive。
#import <BDLive/BDLive.h>

- (BOOL)application:(UIApplication *)application didFinishLaunchingWithOptions:(NSDictionary *)launchOptions {
    [self initBDLive];
    return YES;
}

- (void)initBDLive {
    BDLiveAuthInfo *authInfo = [[BDLiveAuthInfo alloc] init];
    authInfo.bizType = BDLiveBizTypeLiveStreaming; // 如果同时集成开播 SDK 和观播 SDK,可将 BDLiveBizTypeLiveStreaming 替换为 BDLiveBizTypeViewer | BDLiveBizTypeLiveStreaming。
    authInfo.appId = @"APP_ID"; // 将 APP_ID 替换为在 SDK 应用创建后生成的 App ID。
    authInfo.appName = @"APP_NAME"; // 将 APP_NAME 替换为创建 SDK 应用时填写的 App 名称。
    authInfo.channel = @"CHANNEL_NAME"; // 将 CHANNEL_NAME 替换为 App 的渠道名称。默认为 App Store。
    authInfo.liveLicensePath = [[NSBundle mainBundle] pathForResource:@"LIVE_LICENSE_NAME" ofType:@"lic"];// 将 LIVE_LICENSE_NAME 替换为直播 License 文件的名称。

    // (可选)配置美颜、滤镜和道具贴纸功能。通过离线或在线方式获取授权。如需自定义美颜、滤镜和道具贴纸,详见进阶功能。
    // 离线授权。
    authInfo.effectAuthInfo.authType = BDLiveEffectAuthTypeOffLine;
    authInfo.effectAuthInfo.licenseFilePath = [[NSBundle mainBundle] pathForResource:@"CV_LICENSE_NAME" ofType:@"licbag"]; //  将 CV_LICENSE_NAME 替换为 CV License 文件的名称。
    // 在线授权。
    authInfo.effectAuthInfo.authType = BDLiveEffectAuthTypeOnLine;
    authInfo.effectAuthInfo.key = @"KEY"; // 将 KEY 替换为您的业务标识。请联系技术支持获取。
    authInfo.effectAuthInfo.secret = @"SECRET"; // 将 SECRET 替换为您的业务密钥,业务密钥可在创建业务时同业务标识一起获得。请联系技术支持获取。
    // 初始化 SDK。请在连接网络后调用该方法。您可通过 complete 回调获取到 License 的授权结果。
    [[BDLiveManager sharedInstance] startWithAuthInfo:authInfo complete:^(BOOL allSuccess, NSString * _Nullable warningInfo, NSArray<NSError *> * _Nullable errors) {
        NSLog(@"BDLive 【allSuccess】 %d \n 【warningInfo】: %@ 【errors】:\n\n%@", allSuccess, warningInfo, errors);
    }];
}
相关方法,详见 startWithAuthInfo:complete:。
优化包体积
自 SDK 1.31.0 版本开始,您可以按需完成以下操作优化 SDK 的包体积。
- (可选)使用静态库版本的 TTSDK。详见使用静态库版本的 TTSDK。
说明
仅 1.31.0 - 1.34.0 版本需完成该步骤。
- 集成不包含录屏直播功能的开播 SDK。
在添加依赖时,将LiveStreaming替换为LiveStreamingWithoutRTC。详见步骤一:添加依赖。
示例代码如下所示:... # 只集成开播 SDK pod'BDLive', '1.66.1-static-ttsdk', :subspecs => [ 'LiveStreamingWithoutRTC', ] # 同时集成开播 SDK 和观播 SDK pod'BDLive', '1.66.1-static-ttsdk', :subspecs => [ 'LiveStreamingWithoutRTC', 'ViewerWithoutRTC', # 集成不包含超低延时直播以及观众连麦功能的观播 SDK ] end
常见问题
通过 Xcode 15 使用静态库版本的 TTSDK时,编译出现 duplicate symbol 错误怎么办?
Xcode 15 的已知问题导致。详见苹果开发者论坛。
您可以在 Xcode 的 App Target 下,单击 Build Settings > Other Linker Flags,并添加 -ld64。
最近更新时间:2026.05.07 14:40:43
这个页面对您有帮助吗?
有用
有用
无用
无用