GPU-基于Diffusers和Gradio搭建SDXL推理应用
最近更新时间:2023.12.07 17:10:25
首次发布时间:2023.11.02 10:26:21
本文以搭载了一张V100显卡的ecs.g1ve.2xlarge实例,介绍如何在GPU云服务器上基于Diffusers搭建SDXL 1.0的base + refiner组合模型。
背景信息
SDXL
Stable Diffusion XL(简称SDXL)是最新的图像生成模型,与之前的SD模型(stable 1.5和 stable 2.1)相比,SDXL提供更有艺术感、更真实的图像。
Diffusers
Diffusers库是Hugging Face推出的一个操作扩散模型的工具箱,提供Diffusion推理训练全流程,简单方便的使用各种扩散模型生成图像、音频,也可以非常方便的使用各种噪声调度器,用于调节在模型推理中的速度和质量。目前,Diffusers已经支持SDXL 1.0的base和refiner模型,可生成1024 × 1024分辨率的图片。
软件要求
- GPU驱动:用来驱动NVIDIA GPU卡的程序。本文以470.57.02为例。
- Pytorch:开源的Python机器学习库,实现强大的GPU加速的同时还支持动态神经网络。本文以2.0.0为例。
Pytorch使用CUDA进行GPU加速时,在GPU驱动已经安装的情况下,依然不能使用,很可能是版本不匹配的问题,请严格关注虚拟环境中CUDA与Pytorch的版本匹配情况。
- Anaconda:获取包且对包能够进行管理的工具,包含了Conda、Python在内的超过180个科学包及其依赖项,用于创建Python虚拟环境。本文以Anaconda 3和Python 3.10为例。
- Gradio:快速构建机器学习Web展示页面的开源Python库。本文以3.43.2为例。
使用说明
下载本文所需软件需要访问国外网站,建议您增加网络代理(例如FlexGW)以提高访问速度。您也可以将所需软件下载到本地,参考本地数据上传到GPU实例中。
操作步骤
步骤一:创建实例
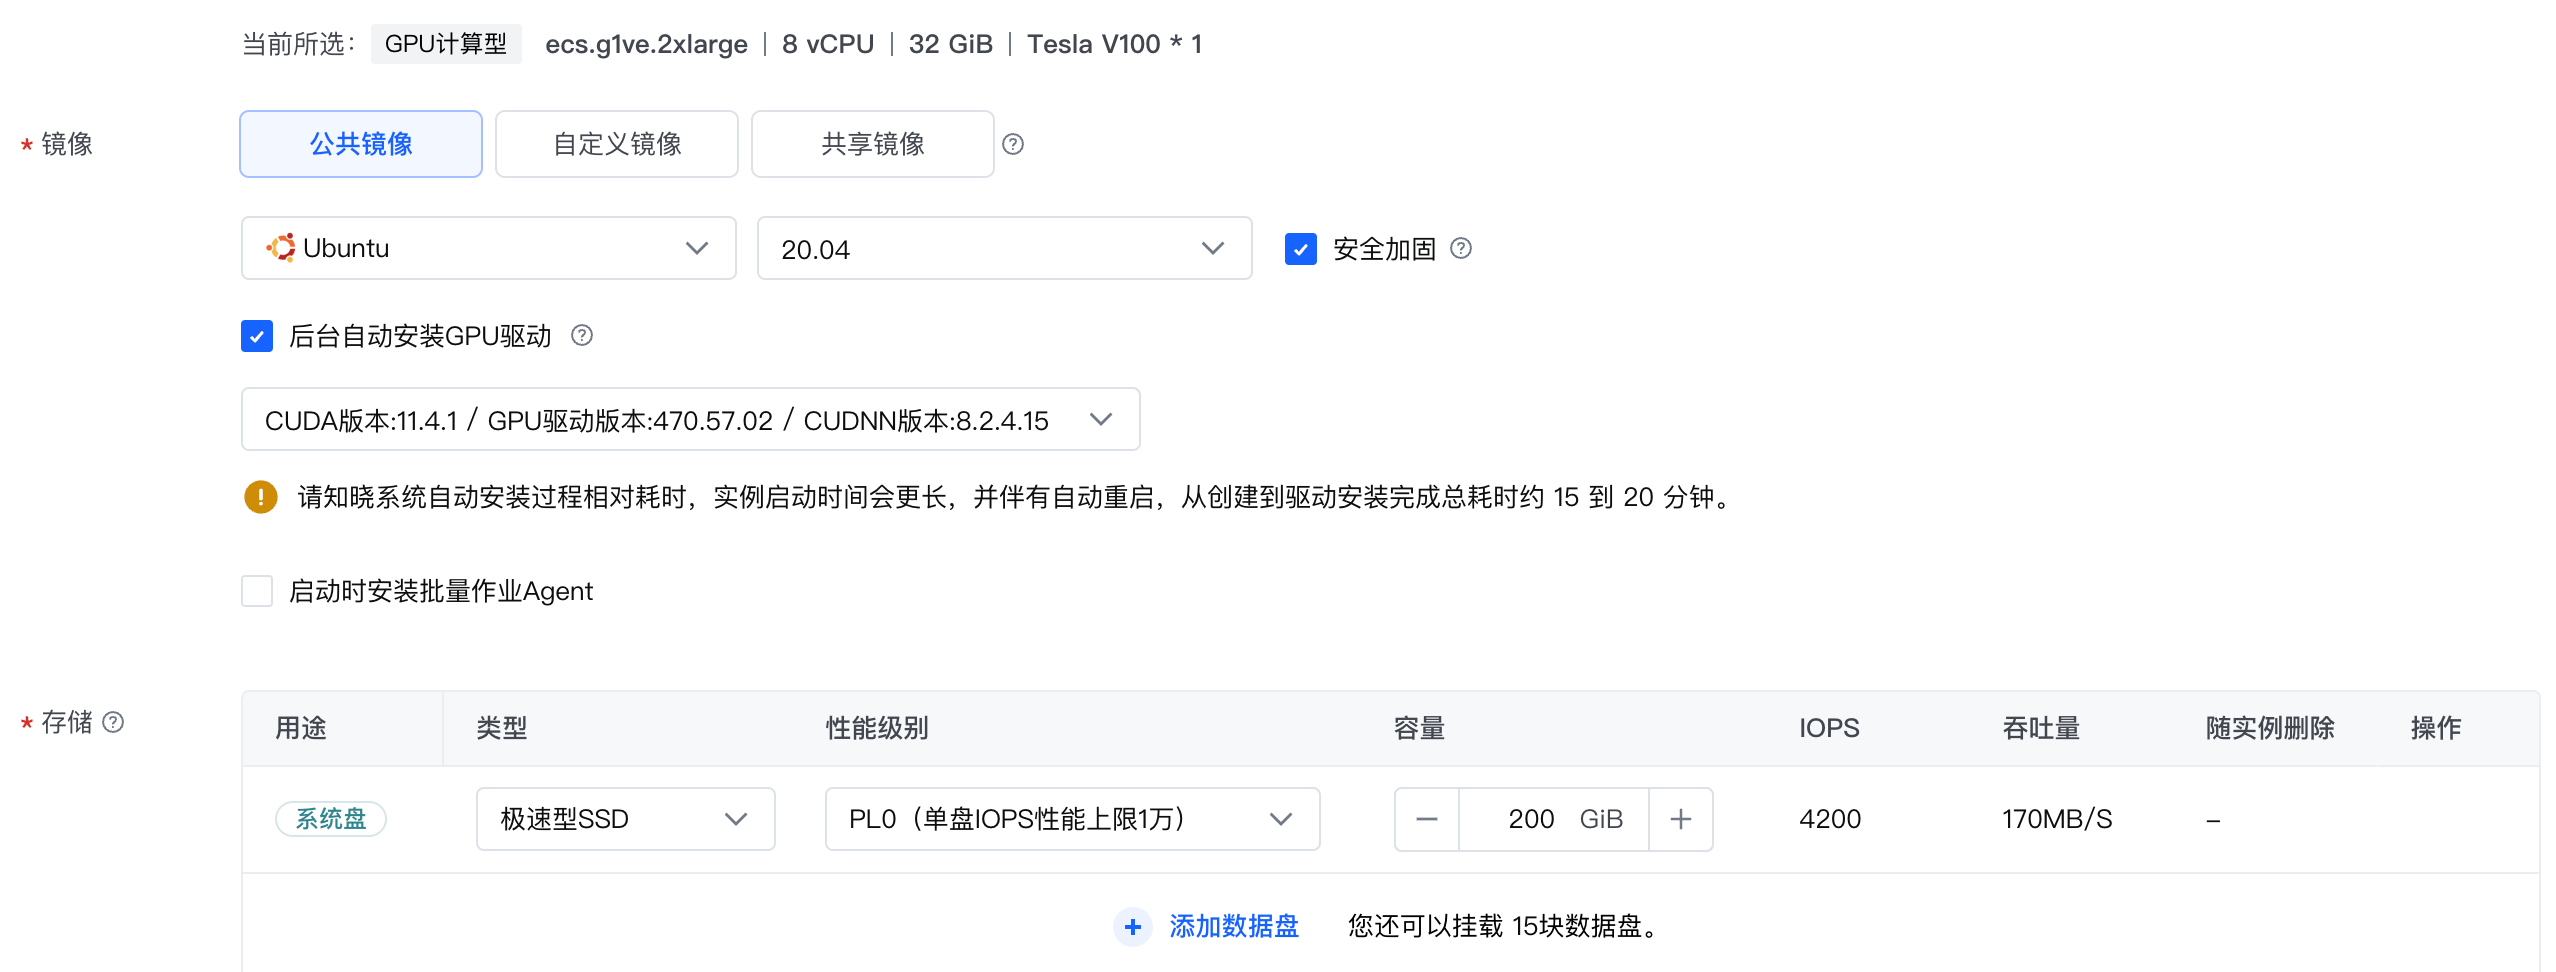
请参考通过向导购买实例创建一台符合以下条件的实例:
- 基础配置:
- 计算规格:ecs.g1ve.2xlarge
- 镜像:Ubuntu 20.04,并勾选“后台自动安装GPU驱动”。
- 存储:云盘容量在100 GiB以上。
- 网络配置:勾选“分配弹性公网IP”。
- 基础配置:
创建成功后,在实例绑定的安全组中添加入方向规则:放行TCP 8000端口。具体操作请参见修改安全组访问规则。
登录实例。
执行以下命令,确认GPU驱动是否安装。
nvidia-smi
回显如下,可以看到驱动版本,表明已成功安装。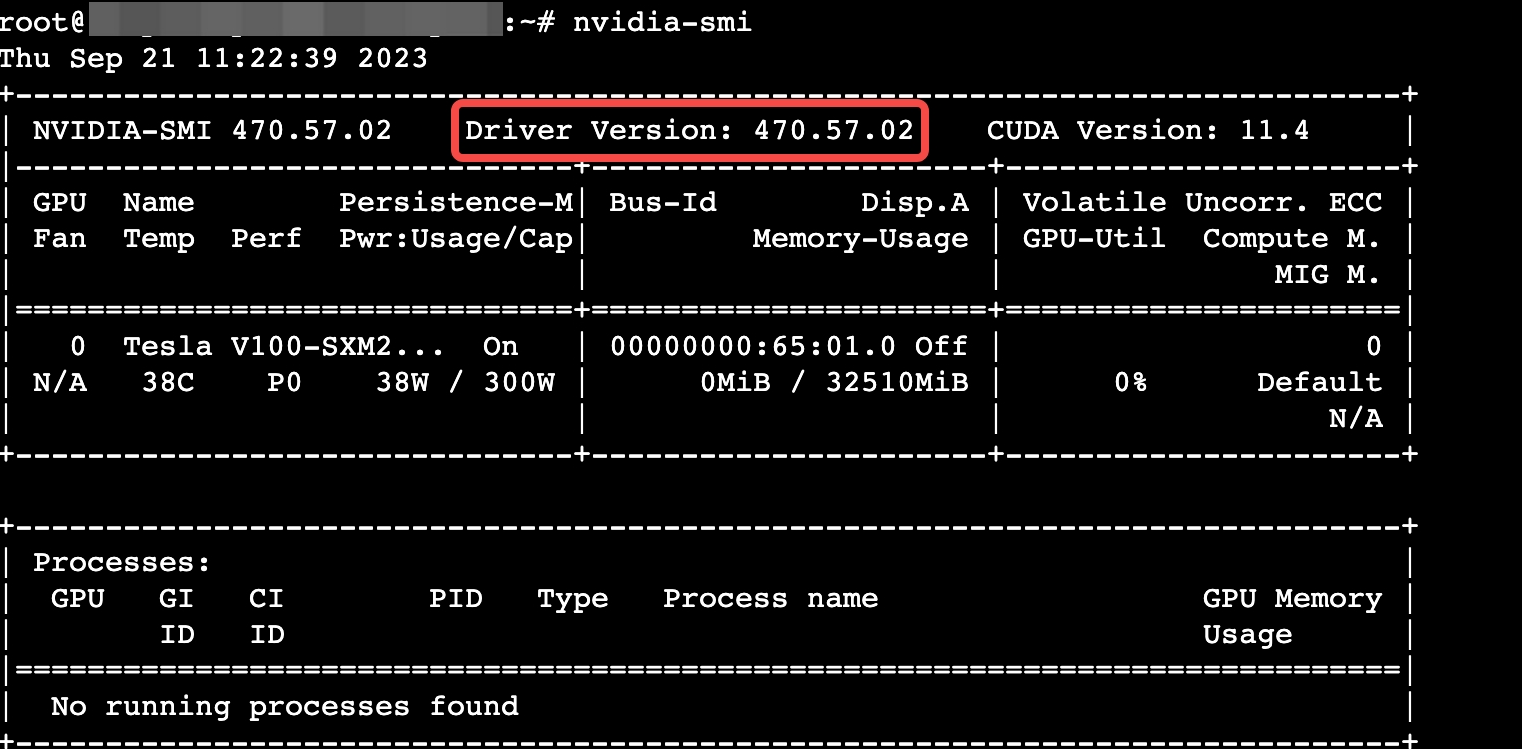
步骤二:准备虚拟环境
执行以下命令,下载Anaconda安装包。
wget https://repo.anaconda.com/archive/Anaconda3-2022.05-Linux-x86_64.sh执行以下命令,静默安装Anaconda。
在静默模式下安装Anaconda时,将使用默认设置,包括安装路径(/root/anaconda3)和环境变量设置。如果您需要自定义这些设置,请使用交互式安装程序。
bash Anaconda3-2022.05-Linux-x86_64.sh -b -p /root/anaconda3安装完成后执行以下命令,初始化Anaconda。
source /root/anaconda3/bin/activate
conda init
执行
conda -V命令,回显如下,表明Anaconda安装成功。
执行
source ~/.bashrc命令,使配置文件生效。创建一个名为“sd-xl”的虚拟环境,并指定该环境中的python版本为3.10。
- 执行
conda create -n sd-xl python=3.10命令。 - 回显
Proceed ([y]/n)?时输入“y”确认。 - 执行以下命令,激活虚拟环境。
conda activate sd-xl
回显如下,表示激活成功。
- 执行
执行以下命令,安装git。回显
Proceed ([y]/n)?时输入“y”确认安装。conda install git执行以下命令,安装CUDA 11.8对应的Pytorch。
本文所示“sd-xl”环境中使用的CUDA版本为11.8。您也可以自行指定CUDA版本并登录Pytorch官网,在Conda中查找与CUDA版本匹配的安装命令。
conda install pytorch==2.0.0 torchvision==0.15.0 torchaudio==2.0.0 pytorch-cuda=11.8 -c pytorch -c nvidia执行以下命令,检查虚拟环境是否符合预期。
python
>>>import torch
>>>torch.cuda.is_available()
回显为
True,表示Pytorch部署成功。输入exit()退出。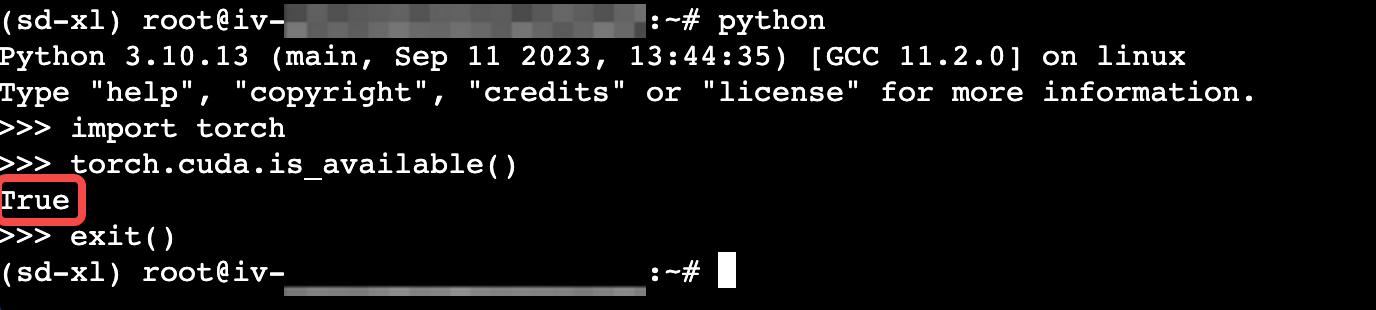
步骤三:模型部署
依次执行以下命令,下载base模型的权重文件。
mkdir -p /root/sd
cd sd
apt install -y git-lfs
git lfs install
git clone https://huggingface.co/stabilityai/stable-diffusion-xl-base-1.0
依次执行以下命令,下载refiner模型的权重文件。
cd /root/sd
git lfs install
git clone https://huggingface.co/stabilityai/stable-diffusion-xl-refiner-1.0
执行
ll命令查看目录中包含如下文件,表示已成功下载。
步骤四:模型推理
txt2img(文生图)示例
- 依次执行以下命令,安装相关依赖组件。
pip install diffusers --upgrade pip install transformers accelerate safetensors - 编写推理脚本。
依次执行以下命令,创建cli_txt2img.py文件。
cd /root/sd
vim cli_txt2img.py
添加如下内容。
from diffusers import DiffusionPipeline
import torch

base = DiffusionPipeline.from_pretrained("/root/sd/stable-diffusion-xl-base-1.0", torch_dtype=torch.float16, use_safetensors=True, variant="fp16")
base.to("cuda")

refiner = DiffusionPipeline.from_pretrained(
    "/root/sd/stable-diffusion-xl-refiner-1.0", text_encoder_2=base.text_encoder_2,vae=base.vae, torch_dtype=torch.float16, use_safetensors=True, variant="fp16",)
refiner.to("cuda")

# Define how many steps and what % of steps to be run on each experts (80/20) here
n_steps = 40
high_noise_frac = 0.8

prompt = "Elon Musk standing in a workroom, in the style of industrial machinery aesthetics, deutscher werkbund, uniformly staged images, soviet, light indigo and dark bronze, new american color photography, detailed facial features"
negative_prompt= "(EasyNegative),(watermark), (signature), (sketch by bad-artist), (signature), (worst quality), (low quality), (bad anatomy), NSFW, nude, (normal quality)"

# run both experts
image = base(
    prompt=prompt,
    negative_prompt=negative_prompt,
    num_inference_steps=n_steps,
    denoising_end=high_noise_frac,
    output_type="latent",
).images

image = refiner(
    prompt=prompt,
    negative_prompt=negative_prompt,
    num_inference_steps=n_steps,
    denoising_start=high_noise_frac,
    image=image,
).images[0]

image.save("/root/sd/test.png")
按
esc退出编辑模式,输入:wq并回车退出当前文件。执行以下命令,运行脚本文件。
python cli_txt2img.py
如下图所示,代表文生图已经完成,可以在/root/sd/test.png查看生成的图片。
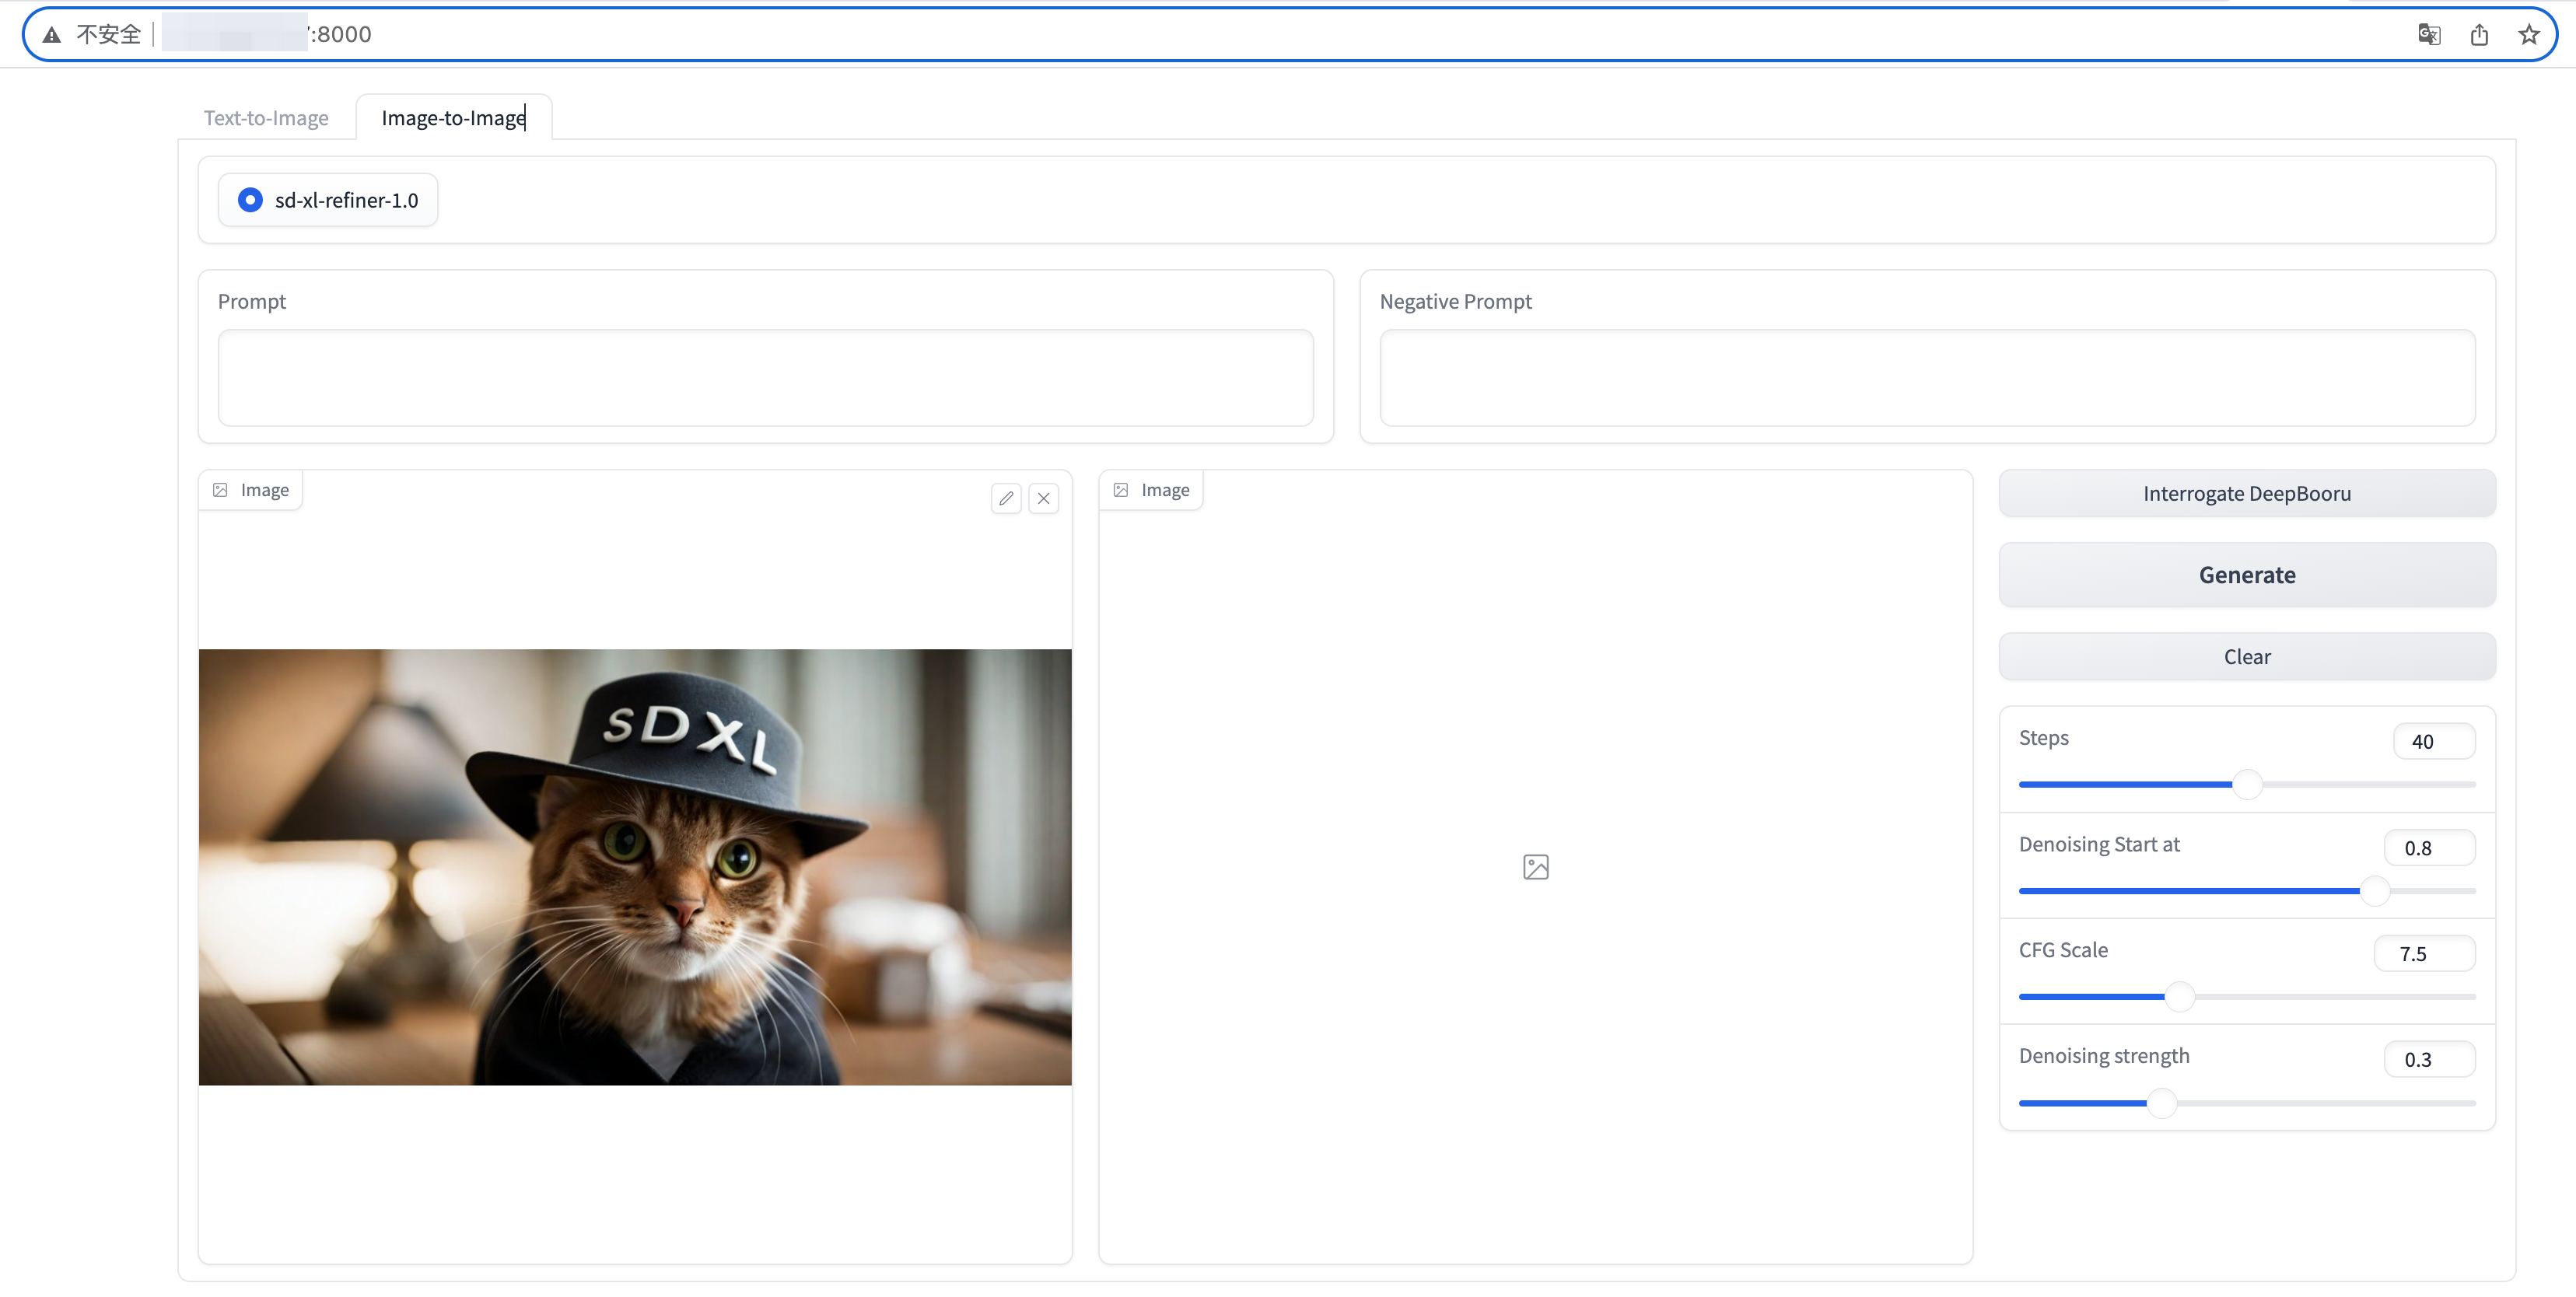
txt2img + img2img示例
基于Gradio搭建txt2img(文生图)和img2img(图生图)的web demo界面。
依次执行以下命令,安装Gradio和相关依赖。
pip install diffusers --upgrade
pip install transformers accelerate safetensors gradio
依次执行以下命令,下载反向提示词模型文件及模型代码。
cd /root/sd
git clone https://github.com/AUTOMATIC1111/TorchDeepDanbooru.git
cd TorchDeepDanbooru
wget https://github.com/AUTOMATIC1111/TorchDeepDanbooru/releases/download/v1/model-resnet_custom_v3.pt
编写推理脚本。
依次执行以下命令,创建web_sdxl_demo.py文件。
cd /root/sd
vim web_sdxl_demo.py
添加如下内容。该脚本包含了txt2img、img2img相关功能。
import numpy as np
import gradio as gr
from diffusers import DiffusionPipeline,StableDiffusionXLImg2ImgPipeline
import torch
import tqdm
from datetime import datetime

from TorchDeepDanbooru import deep_danbooru_model

MODEL_BASE =  "/root/sd/stable-diffusion-xl-base-1.0"
MODEL_REFINER = "/root/sd/stable-diffusion-xl-refiner-1.0"

print("Loading model",MODEL_BASE)
base = DiffusionPipeline.from_pretrained(MODEL_BASE, torch_dtype=torch.float16, use_safetensors=True, variant="fp16")
base.to("cuda")
print("Loading model",MODEL_REFINER)
refiner = StableDiffusionXLImg2ImgPipeline.from_pretrained(MODEL_REFINER, text_encoder_2=base.text_encoder_2,vae=base.vae, torch_dtype=torch.float16, use_safetensors=True, variant="fp16",)
refiner.to("cuda")

# Define how many steps and what % of steps to be run on each experts (80/20) here
# base-high noise, refiner-low noise
# the base model steps = default_n_steps*default_high_noise_frac
default_n_steps = 40
default_high_noise_frac = 0.8
default_num_images =2

def predit_txt2img(prompt,negative_prompt,model_selected,num_images,n_steps, high_noise_frac,cfg_scale):
    # run both experts
    start = datetime.now()

    num_images=int(num_images)
    n_steps=int(n_steps)
    prompt, negative_prompt = [prompt] * num_images, [negative_prompt] * num_images
    images_list = []
    model_selected = model_selected
    high_noise_frac=float(high_noise_frac)
    cfg_scale=float(cfg_scale)

    g = torch.Generator(device="cuda")

    if model_selected == "sd-xl-base-1.0" or model_selected == "sd-xl-base-refiner-1.0":
        images = base(
            prompt=prompt,
            negative_prompt=negative_prompt,
            num_inference_steps=n_steps,
            denoising_end=high_noise_frac,
            guidance_scale=cfg_scale,
            output_type="latent" if model_selected == "sd-xl-base-refiner-1.0" else "pil",
            generator=g
        ).images

    if model_selected == "sd-xl-base-refiner-1.0":
        images = refiner(
            prompt=prompt,
            negative_prompt=negative_prompt,
            num_inference_steps=n_steps,
            denoising_start=high_noise_frac,
            guidance_scale=cfg_scale,
            image=images,
        ).images

    for image in images:
        images_list.append(image)

    torch.cuda.empty_cache()

    cost_time=(datetime.now()-start).seconds
    print(f"cost time={cost_time},{datetime.now()}")

    return images_list

def predit_img2img(prompt, negative_prompt,init_image, model_selected,n_steps, high_noise_frac,cfg_scale,strength):

    start = datetime.now()
    prompt = prompt
    negative_prompt =negative_prompt

    model_selected = model_selected
    init_image = init_image
    n_steps=int(n_steps)
    high_noise_frac=float(high_noise_frac)
    cfg_scale=float(cfg_scale)
    strength=float(strength)

    if model_selected == "sd-xl-refiner-1.0":
        images = refiner(
            prompt=prompt,
            negative_prompt=negative_prompt,
            num_inference_steps=n_steps,
            denoising_start=high_noise_frac,
            guidance_scale=cfg_scale,
            strength = strength,
            image=init_image,
            # target_size = (1024, 1024)
        ).images

    torch.cuda.empty_cache()

    cost_time=(datetime.now()-start).seconds

    print(f"cost time={cost_time},{datetime.now()}")

    return images[0]

def interrogate_deepbooru(pil_image, threshold):
    threshold =0.5
    model = deep_danbooru_model.DeepDanbooruModel()
    model.load_state_dict(torch.load('/root/ai/sd/TorchDeepDanbooru/model-resnet_custom_v3.pt'))
    model.eval().half().cuda()

    pic = pil_image.convert("RGB").resize((512, 512))
    a = np.expand_dims(np.array(pic, dtype=np.float32), 0) / 255

    with torch.no_grad(), torch.autocast("cuda"):
        x = torch.from_numpy(a).cuda()

        # first run
        y = model(x)[0].detach().cpu().numpy()

        # measure performance
        for n in tqdm.tqdm(range(10)):
            model(x)

    result_tags_out = []
    for i, p in enumerate(y):
        if p >= threshold:
            result_tags_out.append(model.tags[i])
            print(model.tags[i], p)

    prompt = ', '.join(result_tags_out).replace('_', ' ').replace(':', ' ')
    print(f"prompt={prompt}")
    return prompt

def clear_txt2img(prompt, negative_prompt):
    prompt = ""
    negative_prompt = ""
    return prompt, negative_prompt

def clear_img2img(prompt, negative_prompt, image_input,image_output):
    prompt = ""
    negative_prompt = ""
    image_input = None
    image_output = None

    return prompt, negative_prompt,image_input,image_output

with gr.Blocks(title="Stable Diffusion",theme=gr.themes.Default(primary_hue=gr.themes.colors.blue))as demo:

    with gr.Tab("Text-to-Image"):
        # gr.Markdown("Stable Diffusion XL Base + Refiner.")
        model_selected = gr.Radio(["sd-xl-base-refiner-1.0","sd-xl-base-1.0"],show_label=False, value="sd-xl-base-refiner-1.0")
        with gr.Row():
            with gr.Column(scale=4):
                prompt = gr.Textbox(label= "Prompt",lines=3)
                negative_prompt = gr.Textbox(label= "Negative Prompt",lines=1)
                with gr.Row():
                    with gr.Column():
                        n_steps=gr.Slider(20, 60, value=default_n_steps, label="Steps", info="Choose between 20 and 60")
                        high_noise_frac=gr.Slider(0, 1, value=0.8, label="Denoising Start at")
                    with gr.Column():
                        num_images=gr.Slider(1, 3, value=default_num_images, label="Gernerated Images", info="Choose between 1 and 3") #num images=4,A10报显存溢出
                        cfg_scale=gr.Slider(1, 20, value=7.5, label="CFG Scale")
            with gr.Column(scale=1):
                with gr.Row():
                    txt2img_button = gr.Button("Generate",size="sm")
                    clear_button = gr.Button("Clear",size="sm")
        gallery = gr.Gallery(label="Generated images", show_label=False, elem_id="gallery",columns=int(num_images.value), height=800,object_fit='fill')

        txt2img_button.click(predit_txt2img, inputs=[prompt, negative_prompt, model_selected,num_images,n_steps, high_noise_frac,cfg_scale], outputs=[gallery])
        clear_button.click(clear_txt2img, inputs=[prompt, negative_prompt], outputs=[prompt, negative_prompt])

    with gr.Tab("Image-to-Image"):
        model_selected = gr.Radio(["sd-xl-refiner-1.0"],value="sd-xl-refiner-1.0",show_label=False)
        with gr.Row():
            with gr.Column(scale=1):
                prompt = gr.Textbox(label= "Prompt",lines=2)
            with gr.Column(scale=1):
                negative_prompt = gr.Textbox(label= "Negative Prompt",lines=2)
        with gr.Row():
            with gr.Column(scale=3):
                image_input = gr.Image(type="pil",height=512)
            with gr.Column(scale=3):
                image_output = gr.Image(height=512)
            with gr.Column(scale=1):
                img2img_deepbooru = gr.Button("Interrogate DeepBooru",size="sm")
                # img2img_clip = gr.Button("Interrogate CLIP",size="sm")
                img2img_button = gr.Button("Generate",size="lg")
                clear_button = gr.Button("Clear",size="sm")

                n_steps=gr.Slider(20, 60, value=40, step=10,label="Steps")
                high_noise_frac=gr.Slider(0, 1, value=0.8, step=0.1,label="Denoising Start at")
                cfg_scale=gr.Slider(1, 20, value=7.5, step=0.1,label="CFG Scale")
                strength=gr.Slider(0, 1, value=0.3,step=0.1,label="Denoising strength")

        img2img_deepbooru.click(fn=interrogate_deepbooru, inputs=image_input,outputs=[prompt])
        img2img_button.click(predit_img2img, inputs=[prompt, negative_prompt, image_input, model_selected, n_steps, high_noise_frac,cfg_scale,strength], outputs=image_output)
        clear_button.click(clear_img2img, inputs=[prompt, negative_prompt, image_input], outputs=[prompt, negative_prompt, image_input,image_output])

if __name__ == "__main__":
    demo.launch(server_name="0.0.0.0", server_port=8000)
按
esc退出编辑模式,输入:wq并回车退出当前文件。执行以下命令,运行脚本文件。
说明
如果之前配置了网络代理,运行该脚本前需删除相关环境变量,不然python运行web demo会提示localhost错误。
python web_sdxl_demo.py如下图所示,代表web服务已成功启动。

浏览器访问
http://<公网IP>:8000/,可以在页面上调节相关参数,生成不同图片。